Electro-Voice 664 Dynamic Microphone
Electro-Voice Model 664 Dynamic Mic
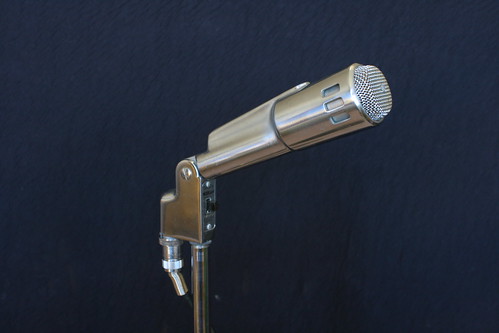
I got this cool old microphone in for some minor repair. It's a classy-looking art-deco kind of mic from the 1950s and 60s, with a very durable chrome finish.
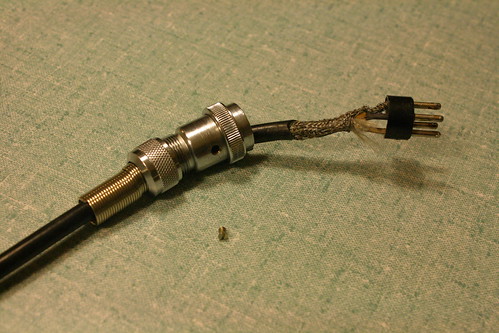
Electro-Voice Model 664 - four pin connector at the mic end.
This one is in really good condition, complete with a solid cable (I don't think it's the original). I soldered a modern XLR connector on the end. It appears they usually came with a 1/4" phone plug. It can be set for high impedance or low impedance (150 ohms) by swapping the white wire in the four-pin Amphenol connector at the mic end. It was originally set for high impedance, which is likely most suitable for plugging into a guitar amp. I tried the mic out that way, plugged into my Allen & Heath console, and it didn't sound very good. It was a little tinny (using my voice as a source), and there was significant noise being picked up. High impedance sources are much more susceptible to picking up electromagnetic interference.

Electro-Voice Model 664 Dynamic Mic
So I swapped the white wire from pin 2 to pin 3 at the mic end. The instructions talk about pulling the "slip pin" out to effect this change, but this connector had the wire soldered into the pin. After the swap, it sounded way better, and the noise was gone. I pulled out a little 1 kHz and boosted about 120 Hz a little, and it sounded pretty good on voice. Looking at the frequency response, this mic really rolls off the low frequencies in order to reduce the proximity effect. The response curve from the data sheet shows 100 Hz to be 5 dB down compared to 1 kHz, so I guess I'm levelling that off a little.

There is more information on Recording Hacks, and some great pics and the engineering data sheet on Coutant's website. Read some background on the Variable-D design on ProSoundWeb and EV's website.
I've got a bunch of pics on my flickr. This is such a groovy looking mic, it's too bad I have to give it back to the owner!!
Memeza Africa – 3rd Canadian Tour
A fantastic choir from South Africa is back once again for a coast-to-coast Canadian tour. I have had the pleasure of recording them, and traveling with them on tour as their bass player. Beautiful people and great singers and dancers!

They start off in Trail, BC on January 25, 2011, and hit numerous provinces, ending up in New Brunswick on February 25, 2011. Last time they were here was early 2009, and they were a big hit, with numerous sell-out shows and raving reviews. Their full schedule is on their website.


There are lots of pictures from the 2009 tour here.
Some pictures from the 2011 tour are here.
A Wired Article on Ribbon Mikes
This article just appeared in Wired. Here is a great quote: "We'll have bands come in and pick up that BK5 like it's coming out of the tomb of Tutankhamen," says Vanderslice, "Like it has this divine healing property. ..."
I have an RCA BK-5A ribbon mike in my studio and have used it on a number of things. Yeah, it sounds pretty good.

RCA BK-5A.
I guess I can now offer Divine Healing services! I better increase my rates!
Actually, Vanderslice continues: "... In the scheme of things, the content of the music, or the lyrics, or the sound of electric guitar or the amplifier, it is a very small percentage of what's going on."
Music?? Lyrics?? That stuff matters? Doh!! 😉
Ribbon Mike Restoration
Here's an interesting article about the guy who restored my RCA BK-5A:
More on the Bluegrass Mike Technique
Recently, I had the opportunity to use an Audio-Technica AT4050 large diaphragm, multi-pattern condenser microphone as a single-mike at a bluegrass concert. I switched it to cardioid and it sounded really great - probably my favourite so far. Everything was so clean and clear. The vocals (a group of women), and all of the instruments (guitar, mandolin, fiddle, autoharp, penny whistle) sounded perfectly natural. I had the upright bass plugged in which helped fill out the bottom end. It was noticeably missing when I tried turning off the bass channel. I used two matched Oktava MK-012 small diaphragm condensers for side mikes, and they worked great. I used them with hypercardioid capsules. The mandolin and one acoustic guitar used them for instrumental breaks.
In the past I have used:
AT3035 - it's a fairly cheap mike, but sounds pretty decent for the money.
Rode K2 tube mike - sounded really good with a variety of voices and instruments.
AKG 414 - also very good.
Rode NT1000 - pretty decent.
They all work pretty well, but they each have a slightly different characteristic.
Sony Condenser Mikes From The 1960s.
I have this old Sony condenser mike.

An old Sony condenser mike
From the pictures and information I found on the web here, I thought it was a C-37-FET. I don't have the power supply that came with it, so I found circuit schematics to figure out how to hook up the five pin XLR connection. I tried reverse engineering the circuit in the mike, and found it's not quite like the circuit diagram in the C-37-FET Technical Manual (which is available on the above web site). Eventually I realized that it is in fact a C-38A (or B??), a 1969 update of the C-37 mikes! There isn't much info available on this mike - it seems quite rare - and I'm not sure all of the information I've found on the web is completely accurate. Apparently this mike has been used at Abbey Road studio to record the Beatles, and Herb Alpert's trumpet on A Taste of Honey:article here.
Update 2010.11.05: new information I have received indicates that my mike is almost, nearly, just about, absolutely for sure a C-38B.
I did get the mike working by building a simple five-pin to three pin XLR converter. The mike can be operated with a 9V battery inserted or an external 9V power supply. Both of these methods can be remotely switched. I suspect it also can run from phantom power since there is a centre tap off the transformer that feeds the powering circuit. But I need to verify that there is a voltage regulator that drops 48 VDC to 9VDC so the DC-DC converter doesn't get fried. The information I found on the web suggests the C-38B, made in 1971, was modified to be used with phantom power. I'm almost sure that this one is not a C-38B, because it seems the C-38B has a three-pin XLR connection, while mine has a five-pin. The guy I got this from has the exact same mike with the power supply and the storage box with the model number on it (C-38A). Turns out his is a C-38B - but the box is from a C-38A!
There a few differences between the C-37-FET and the C-38B. The switch on the C-37-FET can be set to BAT to check the condition of the battery. On the C-38B, the switch is mechanically blocked from going to that position. So don't bother trying (I did). The internal circuitry is somewhat different, but I haven't completely traced out the schematic yet. There are differences in the two internal switches (high cut and 8 dB pad) - see the pictures below. The C-37-FET pictured doesn't have a pad switch.

Sony C-38B - internal view.

Sony C-37-FET - internal view (from www.coutant.org).

Sony C-37-FET - close up internal view (from www.coutant.org).

Sony C-38B inside the headbasket.
Below is the powering diagram from the C-37-FET Technical Manual, which also works with the C-38A/B. Option 1 uses the internal 9V battery, and the switch allows you to turn it off remotely. The switch on the mike has to be on. Option 2 uses the internal 9V battery and has the mike on any time the connector is connected and the switch on the mike is on. This is how I wired my connector gizmo. It seems option 3 is slightly wrong. The jumper between pins 1 and 5 is also necessary here (or connect pin 5 to the shield - same difference).

C-37-FET powering
Here is a summary of the information I have found on similar Sony mikes (I got this info from the internet and some sleuthing, so I'm not 100% sure of its accuracy. If you have any corrections please let me know.):
C-37A: A tube condenser mike introduced by Sony in 1958 intended to compete with the Neumann microphones. Because of the tube circuitry it requires a special external power supply.
C-37P: A FET version of the mike that can be powered with 48VDC to 54VDC phantom power.
C-37-FET: Made in about 1965, it's a version of the C-37A that uses a field effect transistor (FET). It can be powered with an internal 9V battery or an external 9VDC power supply. It has a five pin XLR connector for powering and remote switching.
C-38: I'm not too sure about this one, if it existed. It could be simply a re-labelling of the C-37-FET, or people just dropped the 'A' when referring to it. One source says that the C-38 and the C-37-FET are the same: the C-38 was sold in Japan and the C-37-FET was sold in the US. Update (2010.10.29): I found pictures and some brief information on the C38. It was built in 1965 and the windscreen design is quite different from the C-38A and B. It looks like the C-37-FET inside and out from the photos, but I have no documentation on the C38 to verify if the two are identical.
C-38A: An update of the C-37-FET, introduced in 1969 with a new windscreen design. It has a five pin XLR connector for powering and remote switching. Can be powered by an internal 9V battery or an external 9VDC power supply, and possibly phantom power (I will try to verify this). Update 2010.11.05: A service manual I have obtained (copyright 1980) for the US indicates that the C-37-FET and the C38A have the same internal circuitry. No phantom powering!
C-38B (1971): An update of the C-38A, introduced in 1971. I think it had a three five pin XLR connector (not sure - I have no documentation). Can be powered by an internal 9V battery or 24VDC to 54VDC phantom power.
C-38B (1977): A further update of the C-38B. According to a service manual I have found, it has a three pin XLR connector. It can be powered by an internal 9V battery or 24VDC to 54VDC phantom power.
C-38B (2003): Sony re-released the C-38B in 2003. Can be powered by an internal 9V battery or 24VDC to 48VDC phantom power.
If you have any information about any of these mikes, or corrections to the above, please send it to me, especially the C-38A and C-38B (original) since that information is quite rare. This blog entry has become a little messy with corrections, so I plan to write an updated entry with the most complete information I can find. Owner's manuals and schematics would be great. Thanks!
Edit: Apparently this mike is the classic Manzai mike in Japan (thanks ratite!!). See this.
Restored RCA BK-5A
The RCA BK-5A ribbon mike is back in my hands. Here is a before picture, followed by some after pics. The mike was sanded and repainted to the original colour. The ribbon was completely missing inside the mike (which is what I suspected - I couldn't find one when I took it apart), so Clarence cut a new one and installed it according to the original RCA specification (size, tension, etc.). He put on a new cable since the old one was cracking up. The little screws were mostly missing, and the ones that were there were stripped, so they were all replaced. I didn't have the original shock mount, so Clarence supplied a reproduction shock mount that looks like the original. This mount was pretty expensive, but what are you gonna do. He supplied the knurled knobs for the mount, but unfortunately the threads on the mike are kind of screwed up - somebody must have cranked on the wrong size thread. So I'm not sure how to fix that. I had the little RCA medallion and so that is glued back on. It looks pretty good, and now it's time to check how it sounds.
Read more on ribbon mikes here.

RCA BK-5A before restoration

RCA BK-5A after restoration

RCA BK-5A after restoration
RCA BK-5A after restoration

RCA BK-5A with blast screen.

RCA BK-5A with blast screen.
RCA BK-5A
A quick update ... my RCA BK-5A ribbon mike has been restored by Enak Microphone Repair, and is on its way back to me! It should arrive within a few days along with a repaired mount for my old Sony C37-FET condenser mike. I can't wait to try it out on a vuvuzela. Actually, the only reason I said vuvuzela is to see if I get more google hits. Vuvuzela ya later.
RCA BK-5A
By really dumb luck, I happened to get my hands on an RCA BK-5A, a classic old ribbon microphone from about 1955. A friend of mine had it stashed away in a closet for years and I told him I'd be happy to take it off his hands and get in working order again. It's in rough shape cosmetically and the ribbon is missing. From what I've heard about this mike it's going to be a great addition to the mike complement in my studio. Here is a link to some information: RCA BK-5A.
I found a few places that do restorations on ribbon mikes. They all seem to be pretty well regarded, but I decided to go with ENAK Microphone Repair. The guy there has apparently worked for RCA beginning about 1952, and has been doing high quality restorations for years. I look forward to getting it back and trying it out on vocals and various instruments. I'll put up some pictures of it in a later post, and perhaps some audio clips too.

RCA BK-5A before restoration.

RCA BK-5A before restoration.

RCA BK-5A before restoration. It looks like the ribbon is missing.
The Traditional Bluegrass Microphone Technique: Part 2
This article of mine appeared in the Northern Bluegrass Circle Music Society's December 2009 newsletter. Part 3 of of my two part article is now in the works!
----
The Traditional Bluegrass Microphone Technique. Part 2: How to Work the Mike
In Part 1, we discussed the basic characteristics of mikes. In this instalment, we talk about how to use a single mike. The single mike technique can work quite well, but it can also work really badly. The quality of the acoustic space, the mike and the sound system are important factors, and the sound person only has control of the overall tone and volume. Most of the success of the technique depends on the musicians' skill in working the mike.
Setup
The mike should be placed downstage (towards the audience) to minimize pick-up of echoes off the walls behind and to the sides of the mike. You may have to back it up a little if you get some feedback from the main speakers. Monitor wedges are occasionally used, but not very loud due to feedback. As we discussed in Part 1, proximity to the mike affects the loudness and tonal quality, so the mike needs to be set at the correct height for the band. Consider that the one mike has to pick up the vocals (mouth height) and the instruments (mostly belly height, except for fiddle), so take a look at the relative heights of everybody and their instruments and find a reasonable compromise that covers everything roughly equally. Since vocals are very important in bluegrass, the mike will be a little closer to the mouths than the instruments. The mike can be set a little lower than chin height as that will pick up a good blend of vocals and instruments, and will allow a good audience view of musicians' faces. About two-thirds of the way up, between the lowest instrument and the tallest singer's mouth is a good starting point, but you can experiment to find the best height. The mike will pick up sound from below your mouth, so you don't have to bend over into it. The mike picks up approximately a 120 degree zone on one side of the mike, so cluster your band in a tight arc on the pickup side of the mike.

Fig. 1. Mike height and player placement.
Voices: Know Your Own Volume
There are louder singers, quieter singers, voices that project well, some that don't. Each singer's proximity to the mike will have to take that into account. The lead vocalist should generally be the closest and in the centre – 8 to 12 inches from the mike. Backup vocals should be off to the sides and a little further away, and louder singers will have to back off a little. Some people may have to lean in a little. If you have a quiet voice, get in closer, but not too close - six inches should be about the closest you ever get. During a quiet passage, you should get closer to make sure the words are intelligible. When you belt it out, you can back off a lot and still get the effect without knocking over the first few rows of the audience. Connect the dynamics of the song to the distance from the mike. During your band's vocal practice, it's a good idea to include mike technique practice.
Instruments: Know Your Own Volume
The same idea applies to the instruments. In general, instruments playing rhythm can be further away because they're providing a supporting role, and an instrumental break requires that the instrument be closer to the mike. Usually the acoustic guitar is the quietest instrument, but it depends on your playing style. You can make that Martin project pretty loud (ask your Bluegrass Workshop instructor how), but generally the guitar needs to be quite a lot closer than most instruments, and you may have noticed how the other players in bands usually quiet right down when the guitar takes a break. The main difficulty with the guitar is that getting in close can completely change the tone so it's good to know how different regions of the instrument sound different in front of a mike. If you put the sound hole right in front of the mike, it can sound too boomy with poor definition. Move the guitar over so that the 12th fret on the fingerboard is right in front, and the sound gets much tinnier. Somewhere in between should be optimal so experiment with your own guitar to find the best sounding mike-guitar orientation.
Mandolins generally pick up fairly well even at a distance and they cut through because of their tone. When players do the chop, they can be quite a ways back, but they do need to get a little closer to the mike for the breaks. The banjo is often the loudest instrument, so it can be further away (outside in the parking lot is good).
Due to its size, the standup bass usually ends up the furthest away, and often the bottom end of the instrument sounds fairly weak through the sound system. However if it gets closer, there may be too much string slap. Many top bluegrass bands (such as the Del McCoury Band) will compensate for this by plugging the bass into a separate channel using a direct input (DI) box (oops, did I say "plug-in" in a bluegrass newsletter??).
Side Mikes
You may have noticed a lot of bands use a side mike or two. The placement of one or two small hyper-cardioid (very directional) mikes can make playing instrumental breaks and incidental fills more convenient. These mikes can be placed at more appropriate heights for the instruments. Both Cherryholmes and The Steeldrivers made great use of side mikes at the Edmonton Folk Music Festival this past summer.
 in the centre and two side mikes for instrumental breaks and fills. (Photo by Kevin Jacobson)")
Fig. 2. Cherryholmes. Single mike (looks like a Shure KSM44) in the centre and two side mikes for instrumental breaks and fills. (Photo by Kevin Jacobson)

Fig. 3. The Steeldrivers. Single mike (far right, in front of guitar player's face). IMO, the mike was a bit too high - the fiddle player had to stand on tippy-toes to sing into it. Shure SM57s being used as side mikes. SM57s are cheap dynamic mikes, but surprisingly good. (Photo by Kevin Jacobson)
Practice and Experiment
Just like anything else, it's a great idea to practice mike technique with your band. If you can, set up a mike and a simple recording system at home and try it out. Try it by yourself, try it with your whole band. Try it vocals only, instruments only, and then all together. When you play somewhere, have someone in the audience listen carefully so they can provide some constructive advice. Search for Del McCoury videos on youtube and watch some pro-level microphone work. In particular, check out their performance of Nashville Cats in Austin (below) - a great example of mike technique. Watch how close they get for lead vocals, backing vocals, and instrumental fills and breaks.
Make a Show of It
The most important thing is to sound good, so at the very least your band needs to practice moving around the mike and each other to accommodate what's happening in the song. The lead vocalist needs to move aside for the instrumental breaks, instrumentalists and backup vocalists move in and out as needed. So practice this for every song you do. Once you get skilled, you can choreograph an interesting show with mike technique. Have people zip around the mike to new positions, shuffle people around. Fool around and have fun!
by Kevin Jacobson (www.cavemusic.ca)