RCA BK-5A
By really dumb luck, I happened to get my hands on an RCA BK-5A, a classic old ribbon microphone from about 1955. A friend of mine had it stashed away in a closet for years and I told him I'd be happy to take it off his hands and get in working order again. It's in rough shape cosmetically and the ribbon is missing. From what I've heard about this mike it's going to be a great addition to the mike complement in my studio. Here is a link to some information: RCA BK-5A.
I found a few places that do restorations on ribbon mikes. They all seem to be pretty well regarded, but I decided to go with ENAK Microphone Repair. The guy there has apparently worked for RCA beginning about 1952, and has been doing high quality restorations for years. I look forward to getting it back and trying it out on vocals and various instruments. I'll put up some pictures of it in a later post, and perhaps some audio clips too.
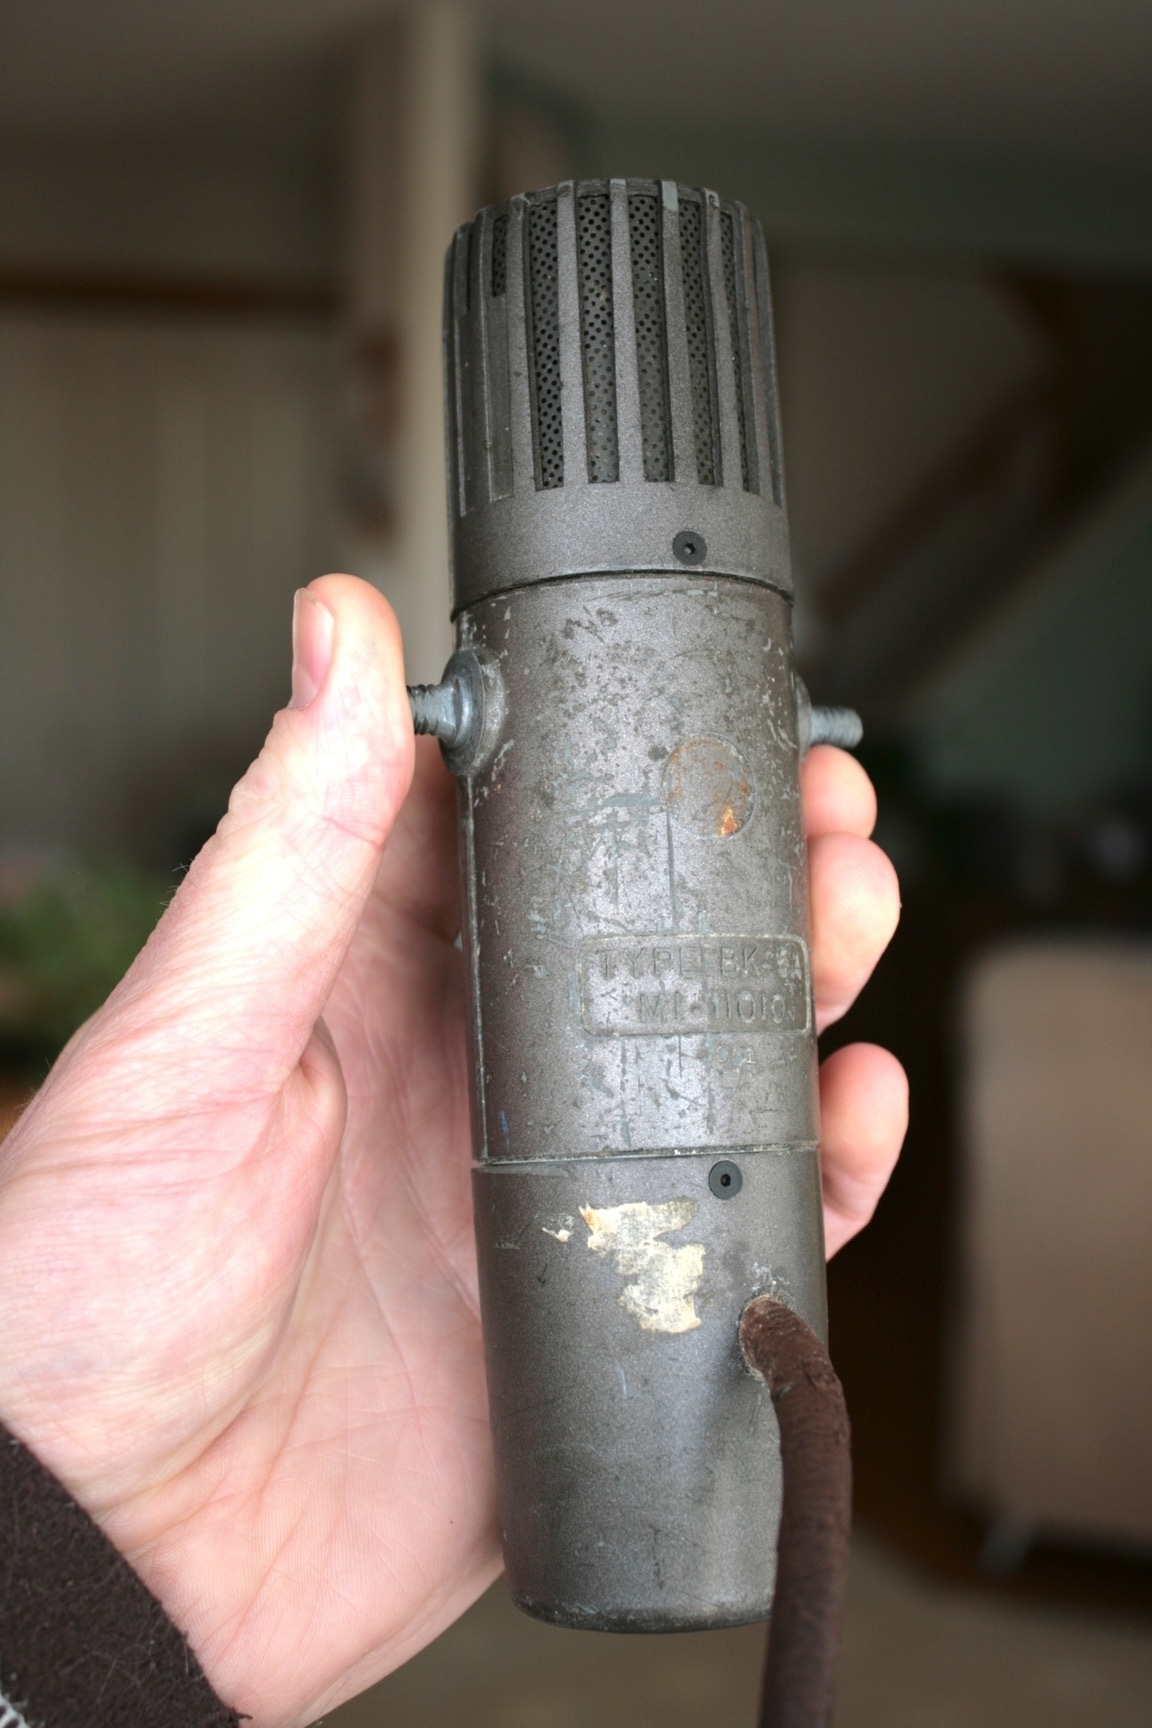
RCA BK-5A before restoration.
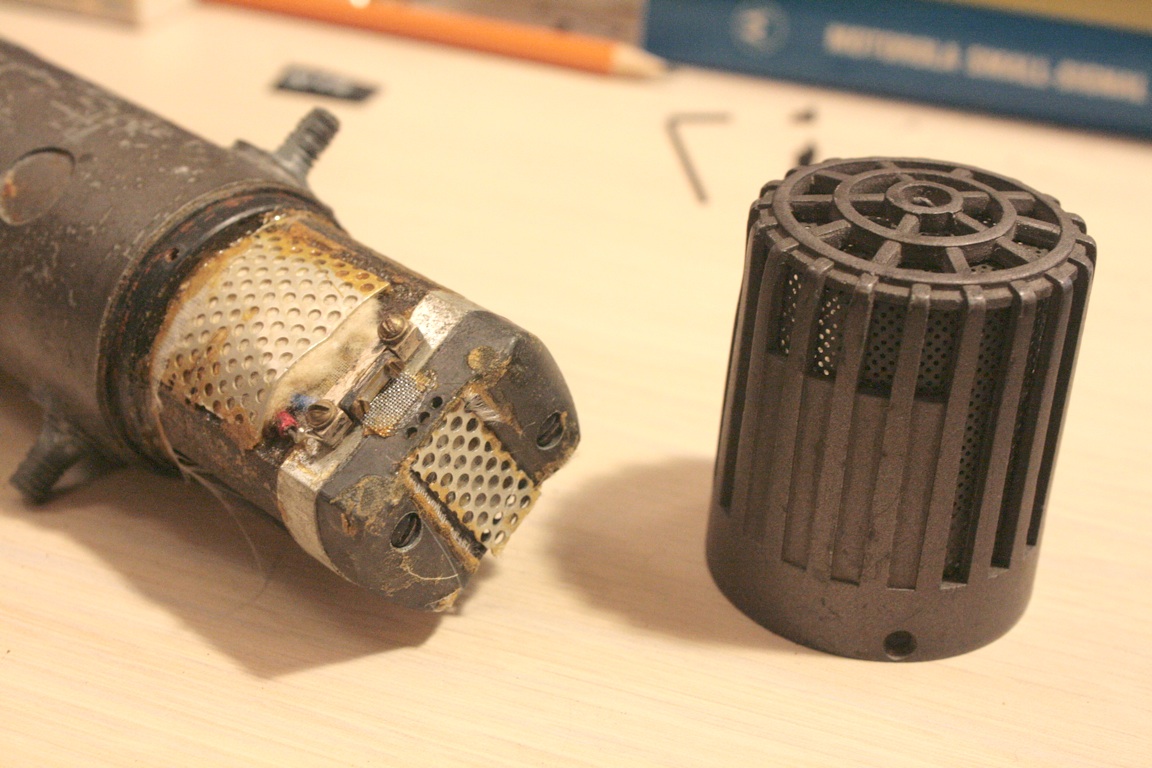
RCA BK-5A before restoration.
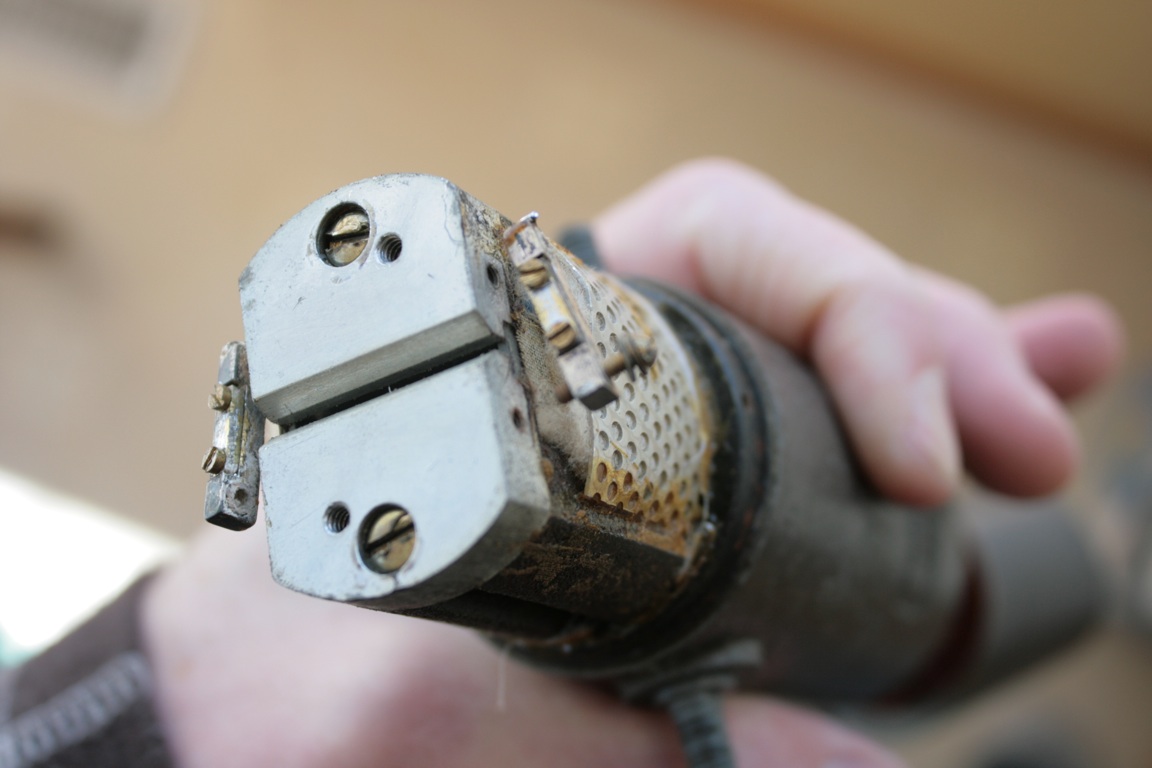
RCA BK-5A before restoration. It looks like the ribbon is missing.
The Traditional Bluegrass Microphone Technique: Part 2
This article of mine appeared in the Northern Bluegrass Circle Music Society's December 2009 newsletter. Part 3 of of my two part article is now in the works!
----
The Traditional Bluegrass Microphone Technique. Part 2: How to Work the Mike
In Part 1, we discussed the basic characteristics of mikes. In this instalment, we talk about how to use a single mike. The single mike technique can work quite well, but it can also work really badly. The quality of the acoustic space, the mike and the sound system are important factors, and the sound person only has control of the overall tone and volume. Most of the success of the technique depends on the musicians' skill in working the mike.
Setup
The mike should be placed downstage (towards the audience) to minimize pick-up of echoes off the walls behind and to the sides of the mike. You may have to back it up a little if you get some feedback from the main speakers. Monitor wedges are occasionally used, but not very loud due to feedback. As we discussed in Part 1, proximity to the mike affects the loudness and tonal quality, so the mike needs to be set at the correct height for the band. Consider that the one mike has to pick up the vocals (mouth height) and the instruments (mostly belly height, except for fiddle), so take a look at the relative heights of everybody and their instruments and find a reasonable compromise that covers everything roughly equally. Since vocals are very important in bluegrass, the mike will be a little closer to the mouths than the instruments. The mike can be set a little lower than chin height as that will pick up a good blend of vocals and instruments, and will allow a good audience view of musicians' faces. About two-thirds of the way up, between the lowest instrument and the tallest singer's mouth is a good starting point, but you can experiment to find the best height. The mike will pick up sound from below your mouth, so you don't have to bend over into it. The mike picks up approximately a 120 degree zone on one side of the mike, so cluster your band in a tight arc on the pickup side of the mike.
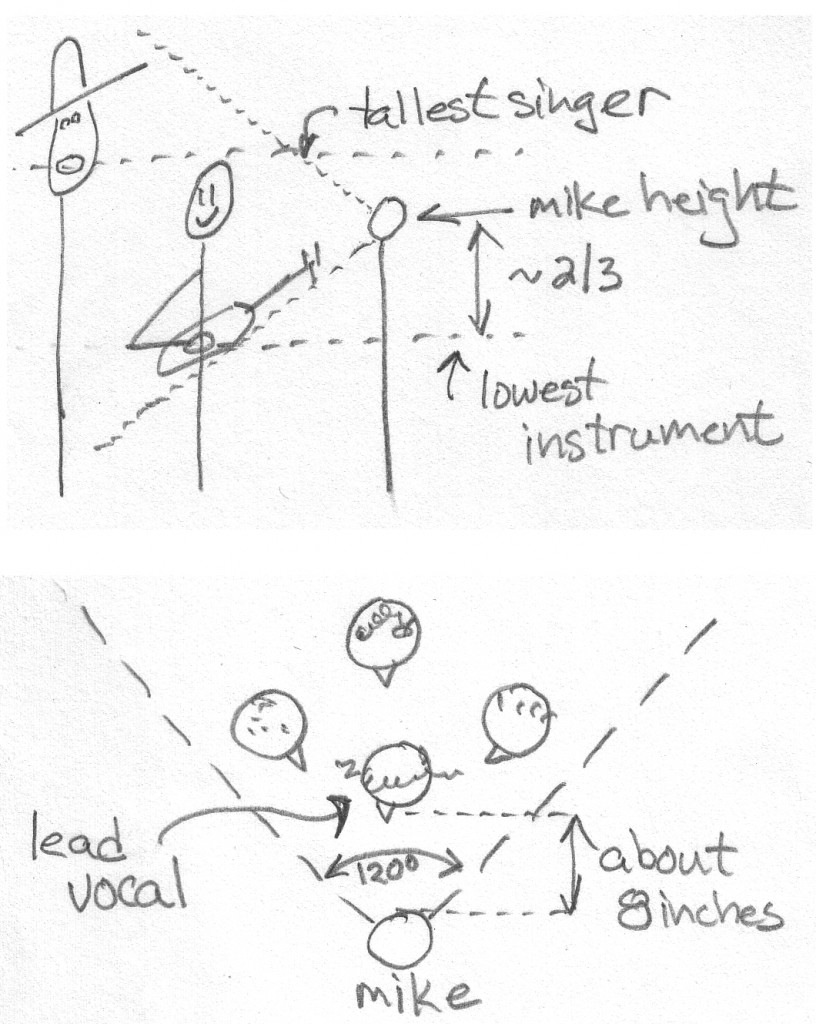
Fig. 1. Mike height and player placement.
Voices: Know Your Own Volume
There are louder singers, quieter singers, voices that project well, some that don't. Each singer's proximity to the mike will have to take that into account. The lead vocalist should generally be the closest and in the centre – 8 to 12 inches from the mike. Backup vocals should be off to the sides and a little further away, and louder singers will have to back off a little. Some people may have to lean in a little. If you have a quiet voice, get in closer, but not too close - six inches should be about the closest you ever get. During a quiet passage, you should get closer to make sure the words are intelligible. When you belt it out, you can back off a lot and still get the effect without knocking over the first few rows of the audience. Connect the dynamics of the song to the distance from the mike. During your band's vocal practice, it's a good idea to include mike technique practice.
Instruments: Know Your Own Volume
The same idea applies to the instruments. In general, instruments playing rhythm can be further away because they're providing a supporting role, and an instrumental break requires that the instrument be closer to the mike. Usually the acoustic guitar is the quietest instrument, but it depends on your playing style. You can make that Martin project pretty loud (ask your Bluegrass Workshop instructor how), but generally the guitar needs to be quite a lot closer than most instruments, and you may have noticed how the other players in bands usually quiet right down when the guitar takes a break. The main difficulty with the guitar is that getting in close can completely change the tone so it's good to know how different regions of the instrument sound different in front of a mike. If you put the sound hole right in front of the mike, it can sound too boomy with poor definition. Move the guitar over so that the 12th fret on the fingerboard is right in front, and the sound gets much tinnier. Somewhere in between should be optimal so experiment with your own guitar to find the best sounding mike-guitar orientation.
Mandolins generally pick up fairly well even at a distance and they cut through because of their tone. When players do the chop, they can be quite a ways back, but they do need to get a little closer to the mike for the breaks. The banjo is often the loudest instrument, so it can be further away (outside in the parking lot is good).
Due to its size, the standup bass usually ends up the furthest away, and often the bottom end of the instrument sounds fairly weak through the sound system. However if it gets closer, there may be too much string slap. Many top bluegrass bands (such as the Del McCoury Band) will compensate for this by plugging the bass into a separate channel using a direct input (DI) box (oops, did I say "plug-in" in a bluegrass newsletter??).
Side Mikes
You may have noticed a lot of bands use a side mike or two. The placement of one or two small hyper-cardioid (very directional) mikes can make playing instrumental breaks and incidental fills more convenient. These mikes can be placed at more appropriate heights for the instruments. Both Cherryholmes and The Steeldrivers made great use of side mikes at the Edmonton Folk Music Festival this past summer.
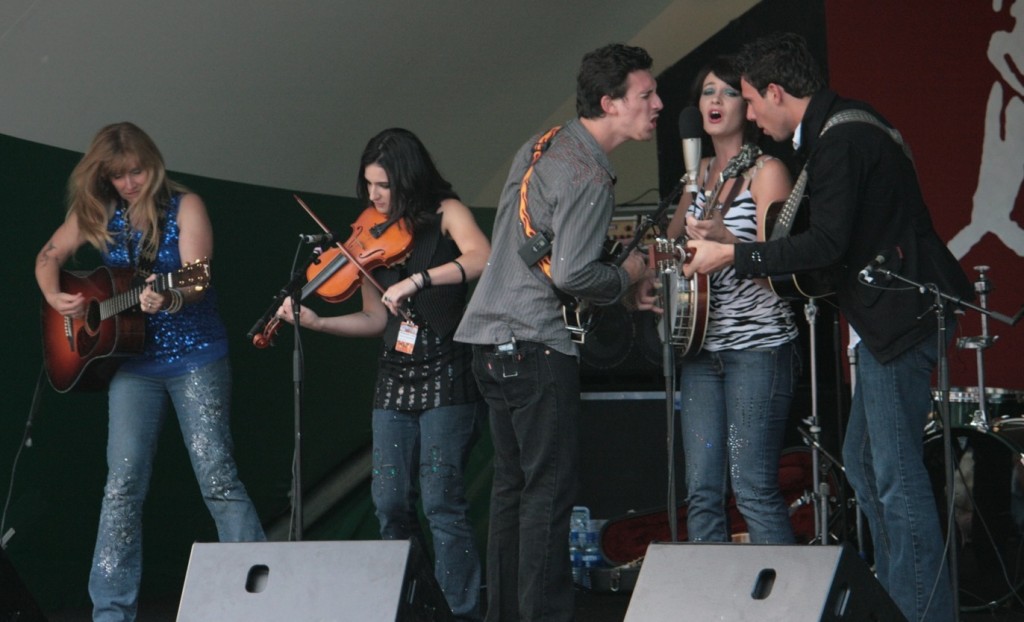
Fig. 2. Cherryholmes. Single mike (looks like a Shure KSM44) in the centre and two side mikes for instrumental breaks and fills. (Photo by Kevin Jacobson)

Fig. 3. The Steeldrivers. Single mike (far right, in front of guitar player's face). IMO, the mike was a bit too high - the fiddle player had to stand on tippy-toes to sing into it. Shure SM57s being used as side mikes. SM57s are cheap dynamic mikes, but surprisingly good. (Photo by Kevin Jacobson)
Practice and Experiment
Just like anything else, it's a great idea to practice mike technique with your band. If you can, set up a mike and a simple recording system at home and try it out. Try it by yourself, try it with your whole band. Try it vocals only, instruments only, and then all together. When you play somewhere, have someone in the audience listen carefully so they can provide some constructive advice. Search for Del McCoury videos on youtube and watch some pro-level microphone work. In particular, check out their performance of Nashville Cats in Austin (below) - a great example of mike technique. Watch how close they get for lead vocals, backing vocals, and instrumental fills and breaks.
Make a Show of It
The most important thing is to sound good, so at the very least your band needs to practice moving around the mike and each other to accommodate what's happening in the song. The lead vocalist needs to move aside for the instrumental breaks, instrumentalists and backup vocalists move in and out as needed. So practice this for every song you do. Once you get skilled, you can choreograph an interesting show with mike technique. Have people zip around the mike to new positions, shuffle people around. Fool around and have fun!
by Kevin Jacobson (www.cavemusic.ca)
More Techie Stuff On Microphones – Frequency Response
So I asked a bunch of people what they thought of Part 1 of my microphone article. It seems most people liked it, but some people thought it was too techie (Part 2 will not be so techie, so stay tuned), some people thought it was not techie enough and wanted to know lots more, and some people thought it was about right. I guess on average it was about okay. A lot more could be said about microphones, so especially for you tech-heads, here's an addendum.
A person might well ask, what are the main aspects of microphones that would make you choose one over another? (Go ahead, ask me.) Well, there's the price, size, reliability, the looks, pickup pattern (I talked a little about cardioid, hyper-cardioid, figure eight, and omni-directional patterns in Part 1), sensitivity, low noise and perhaps most importantly, how it sounds. Of course there are many different applications of microphones, like broadcast, live and studio situations, and many different sound sources, like drums, electric guitars, acoustic instruments, piano, voices, horns, and so on. That's too much to cover, so I will talk primarily about vocals and acoustic instruments, and "how it sounds". In using a mike, the goal is normally to pick up the vocal or instrument as accurately as possible, so that it sounds most natural through the sound system. Knowing that any sound is composed of a wide range of vibration frequencies (sound audible to humans ranges from about 20 Hz to 20 kHz at best), the frequency response of a microphone is a useful measure of the accuracy of the mike, and you would expect (perhaps?) this frequency response to be very flat, so that all audible frequencies are reproduced equally.
Let's look at the frequency responses of a few commonly-used mikes. Fig. 1 shows the typical response of the AT4033/CL, a cardioid condenser mike favoured by Del McCoury, and many bluegrass bands. Notice that it's not really flat? There are a few bumps up around 6 kHz and 10 kHz. 10 kHz is an area of the sound spectrum that can be described "crispy," "bright," "breathy," and so on. This emphasis in response here can help bring out bright aspects of strings and voices. Intelligibility of a vocal resides between about 4 to 6 kHz. The response drops off above 15 kHz and below about 30 Hz. Frequencies above 15 kHz are really quite high pitched, and most people can't hear much of it anyways, so it's not useful to reproduce (and it's harder too). The lowest note, E, on a string bass is about 42 Hz, so you don't need much below that either. You need some response at the bottom, however, so keep the fullness of the notes intact. Note that there is a roll-off curve too. Most mikes have a low rolloff switch (also called high pass) to attenuate the lower frequencies. There are two main reasons for this. First, a lot of low frequency noise can appear from stage rumbling and mike handling, so rolling that off is very helpful and doesn't harm the sound. Second, pretty much all cardioid pattern mikes have a problem (or benefit, depending on your viewpoint) called proximity effect. That is, the closer you get to the mike, the more pronounced the low frequencies become. So rolling that off can compensate when you're singing or playing quite close to the mike.
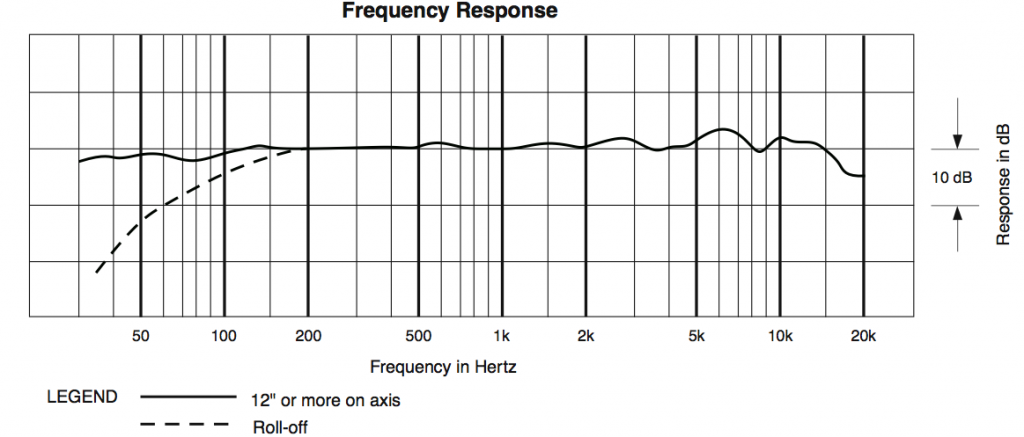
Frequency response of AudioTechnica AT4033/CL
Fig. 2 shows the cardioid response of the KSM44, another popular bluegrass condenser mike. Like the AT4033/CL, there are two bumps up at about 6 kHz and 10 kHz. This plot shows the proximity effect quite well: the low end response is quite high even 15 cm from the mike. Fortunately this mike has a three-position low frequency rolloff switch to compensate.
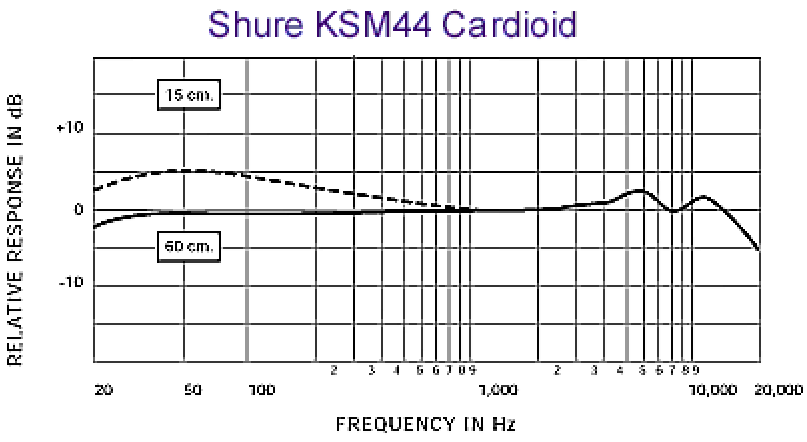
Frequency response of Shure KSM44.
Fig. 3 shows the frequency response of the Neumann U87Ai, one of the most commonly used mikes in recording studios (the studios that can afford them anyhow). This is a smoothed curve - individual mike responses usually are much bumpier. Again, there's a bump up around 8 to 10 kHz, and pretty drastic rolloff starting at 60 Hz. With the low cut switch on, the rolloff is even more dramatic.

Frequency response of Neumann U87Ai.
Finally, Fig. 4 shows the response of the Shure SM81, a small diaphragm condenser mike favoured for miking acoustic instruments and cymbals. Notice how flat the response is all the way from about 40 Hz to about 15 kHz.
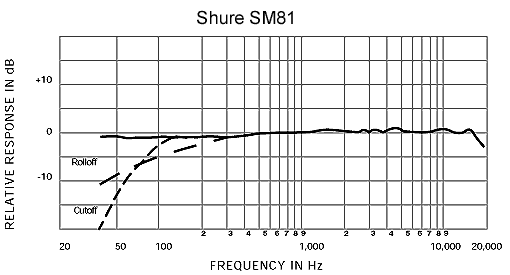
Frequency response of Shure SM81.
How do mike manufacturers achieve different results? The are a few factors. First, there is the diaphragm design. The diaphragm is the part that vibrates with the sound. A large diaphragm (about 1 inch in diameter) generally has a good low frequency response, but might not move fast enough to capture high frequency transients that happen with bright guitar strings and cymbals. Small diaphragms capture high frequencies and transient detail better but may suffer in the low end. There are also medium sized diaphragm mikes that offer a good compromise. Another factor is the acoustic design of the capsule mounting and housing. Changing the shape of the housing and the positioning of the capsule can change the acoustic characteristics of the mike. Finally, the electronics inside the mike (especially in the case of condenser mikes) have a significant effect. Two main classes of electronics in condenser mikes are tube mikes and FET (field effect transistor) mikes.
I started out by supposing that a "good" mike should have a flat frequency, but it turns out that the best mikes chosen by most recording engineers and musicians do not necessarily have such a characteristic. The frequency response is an objective measure, but really people choose equipment subjectively to suit the task, and according to what they want to hear. This leads into a whole new topic called psychoacoustics, which is about how the human ears and brain perceive sounds. Read about that here.
In summary, it looks like a lot of good mikes have similar characteristics, but there are numerous subtle differences too. Knowing that most mikes have been designed carefully to have particular characteristics for a particular job, you realize that you shouldn't have to do much equalization to get a good mike to sound good. Mike placement, however, can make a huge difference in how things sound, and that's a whole 'nother topic too.
A person might well ask, which mike should I buy? (Go ahead, ask me.) Um ... it depends on many things: budget, application, personal preference, etc. That sounds like another whole 'nother topic. My best advice for now: buy the best one you can afford, stick to some good and proven brands (Shure, AKG, AudioTechnica, etc.), be suspicious of hype and myths, and don't worry about it too much.
Reading Update: Truth Is Stranger Than Publicity

Truth Is Stranger Than Publicity
Some time ago I finished reading "Truth Is Stranger Than Publicity" by Alton Delmore, edited by Charles K. Wolfe. Alton Delmore and his brother Rabon were the Delmore Brothers, a very influential duo from the early days of country music. Written by someone who saw it happen first-hand, it gives you great insight into the growth of music during that era, and the challenges that professional musicians met. Delmore talks about the musicians they encountered, (he claims to have given Roy Acuff his key break into the business), and the tough deals handed musicians by agents. The Delmore Brothers wrote an enormous number of songs, and their unique vocal style has influenced such artists as the Everly Brothers, Jim and Jesse, and Bob Dylan. They were a mainstay on Grand Ole Opry and other radio stations, sold out performances, and had numerous hits during their career, but barely managed to eke out a living.
The unfinished manuscript was edited by Wolfe, but left mostly as Delmore wrote it. If you're interested in music at all, this is a great book to read.
The Traditional Bluegrass Microphone Technique: Part 1
This article of mine appeared in the Northern Bluegrass Circle Music Society's September newsletter. Part 2 will appear in January.
----
As most bluegrass aficionados are aware, many bluegrass and olde tyme musicians prefer the single mike technique for sound reinforcement. This technique can work quite well, but musicians need to understand how to work the mike properly in order to achieve the best sound. With one mike, and therefore one channel in operation at the mixing board, the sound person can do little to modify the sound - it's up to the musicians to achieve a good blend of instruments and voices. This can be difficult since the musicians can't hear exactly what the audience is hearing. The main performing advantages of the single mike technique are: the players get close together so they can hear and blend voices and instruments well, and it looks really cool as the musicians whiz around taking turns singing and playing instrumental breaks. This two-part article is intended to help people understand a little more about this technique. Part 1 talks briefly about the history and some technical details about microphones, and Part 2 will discuss proper microphone technique.
Part 1: History and Technical Stuff
Legend has it that way back before most of us were born, there weren't no iPods and there weren't no 'lektricity. Most music venues were designed with good acoustics, performances were small, and musicians knew how to project their sound acoustically. The arrival of newfangled technology: radio broadcast and sound reinforcement in the 1920s, allowed performers to be heard by much larger audiences. The earliest sound systems were simple, using a single omnidirectional or figure eight microphone with one amplifier channel to pick up an entire band. Musicians adapted, moving around the mike as necessary. As it turns out, much of country and bluegrass music was developing at this particular time. Although multiple channels are now easily and cheaply available, traditionalists prefer to use a single mike.
The Microphone
The term "omni" microphone is often misused. Omnidirectional microphones pick up sound equally all around the mike, but this is not very good since the band usually clusters on one side of the mike facing the audience. Omni mikes would pick up the audience side also, and suffer very badly from feedback problems. Therefore, most mikes used in live situations today are directional, having a "cardioid" pickup pattern. They generally pick up sound within about a 120 degree range on one side of the mike, and reject sound on the other side. Some mikes can be switched between cardioid, figure eight, and omni pickup patterns. Fig. 1 shows cardioid, figure eight and omni polar patterns. The polar pattern shows the level of pickup as you move around the mike. For example, the cardioid polar plot shows higher pickup at the front of the mike, lower pickup off to the sides, and almost no pickup at the back of the mike.
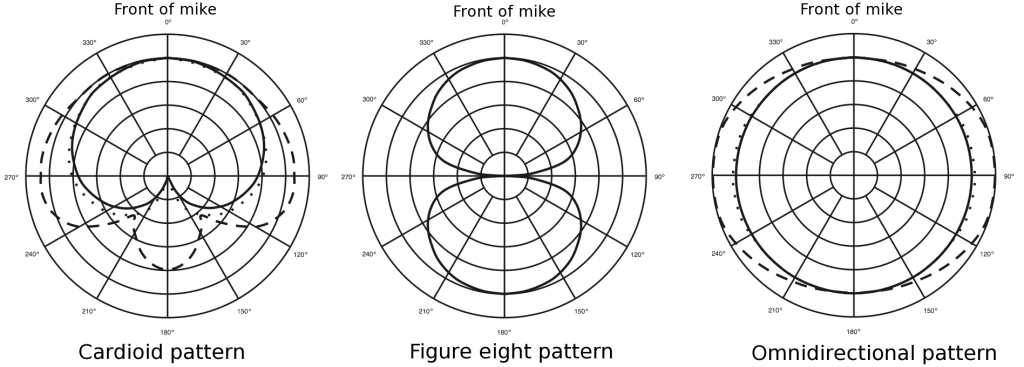
Figure 1: Cardioid, figure eight, and omnidirectional mike patterns. The solid line indicates the pickup “zone.”
Popular mikes in the bluegrass world are the Audio-Technica AT4033 and the Shure KSM32/44. These are high-quality, high-sensitivity, large-diaphragm condenser mikes. They have very clear sound, but they do not have quite the same sound of the RCA 44A and 77B ribbon mikes that were often used at the Grand Ole Opry, WSM radio, and in early recordings. Fig. 2 shows the old-timer ribbon mikes, the modern AT4033 condenser mike, and the Shure SM57, a very common dynamic mike.
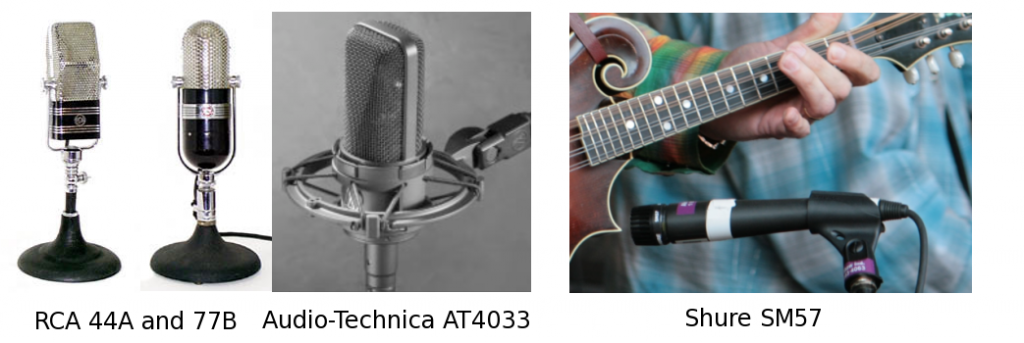
Figure 2: RCA 44A and 77B (ribbon mikes), the modern AT4033 (condenser) with shockmount, and the Shure SM57 (dynamic)
Dynamic, condenser, or ribbon mike? There's too much techie stuff required to explain the differences fully, but here is a summary. Dynamic mikes are very cheap, and immune to abuse (dropping them, swinging them through the air) and thus have become very popular live mikes. Condenser and ribbon mikes are generally more expensive (although that has changed a lot recently), have much better sound, and are susceptible to damage. Also, condensers require "phantom power" (48 volt power sent from the mixing board) while dynamics and ribbons do not. Ribbons are the most expensive and the most delicate, so usually large-diaphragm cardioid (directional) condenser mikes are favoured for live sound. The condenser diaphragm is the part that converts the sound to an electrical signal. A large diaphragm gives better low end response, but sometimes this is at the expense of high frequency detail.
Microphone Characteristics
You probably already know that the closer you get to a mike, the louder it picks up. So you need to be fairly close to be heard. What you may not realize, is that proximity to the mike also affects the tone of the sound. Generally, the best sound is directly in front of the mike and about six to eighteen inches away from the mike. When you get too close, the mike starts to sound really boomy (this is called the proximity effect, and the amount varies from one microphone to another), and it can pick up "plosives" like "p," "b," etc., and that can sound really bad amplified. You may also get distortion due to the high sensitivity, or you can suddenly get too loud and wake up the sound guy (and that's never a good thing). If you're too far from the mike, the sound gets really thin and tinny sounding, and the mike picks up more echoey room sound relative to the direct sound. Moving from the centre of the mike off to the side also changes the tonal quality somewhat. Mikes pick up footstomps on the stage, wind blowing through the mike's grill, and the entire acoustic space the band is in (not to mention DTTW's bottles tinkling, and any mumbling band members). Mikes should be mounted in a shock mount (that cage thing), and at outdoor festivals it's a good idea to use a windscreen. The quality of the acoustic surroundings is an often overlooked part of the sound. If the stage area is boxy and echoey sounding, that's what will get into the mike and amplified, and there will be big problems with feedback. The single mike technique is especially difficult to use in a bad acoustic space.
That's about enough for this instalment. Please tune in next time when I discuss microphone technique.
by Kevin Jacobson (www.cavemusic.ca)
Memeza Africa – Upcoming Shows
Memeza Africa's really big show is tomorrow! Friday, May 29th at the fabulous Winspear Centre in Edmonton, Alberta, Canada!
More shows are coming up in the next few days in Alberta and Saskatchewan. Numerous shows in Alberta and BC have been sold out, so get your tickets now.
May 29, 2009
Concert in Support of Edzimkulu A society for Children of Aids
Winspear Theatre
Edmonton, Alberta
Winspear Box Office
780 428 1414
1 800 563 5081
www.winspearcentre.com
May 30, 2009 7:30p.m.
Vermilion, Alberta
Lakeland College
Tickets at Vermilion Stationery
4913-50 Ave
780-853-2979
vermilionstationery@gmail.com
June 1, 2009
Broadway Theatre
715 Broadway Avenue
Saskatoon, Saskatchewan
www.broadwaytheatre.ca
June 2, 2009
Ulmer Chev Stage
Vic Juba Theatre
Lloydminster, Alberta
www.vicjubatheatre.ca
www.memezaafrica.org
www.flickr.com/photos/cavemusic/sets/72157616720118734/show/
Memeza Africa Western Canadian Tour – It’s Off and Running
 A few shows under their belt, a couple of them sold out, with enthusiastic audience response ... it's going well. The next show is in Edmonton on April 24, 2009, and then they leave for a three week tour through Alberta and BC. Check out the tour dates at Memeza Africa.
Here are some pics from the first few shows in Alberta:
Memeza Africa Is Back In Canada
The great choir from South Africa is arriving this week for their 2009 tour. They have a number of tour dates booked in BC, Alberta, and Saskatchewan, and more will be announced as they unfold. A whole new show was written and rehearsed in South Africa. It should be a great show, so check them out at a venue near you.
Concert dates appear on their new website: www.memezaafrica.org.
You really need to see them! Trust me. I was lucky enough to get them in my recording studio.
I Upgraded the Hard Drive In My MacBook Pro

My main computer in the recording studio is a 2.33 GHz Core 2 Duo MacBook Pro cca. 2007. The hard drive that it came with was only 120 GB, which isn't very big when you have a number of recording projects on the go, lots of photos, iTunes full of tons of music and so on. So I ordered a 320 GB drive and external USB2 enclosure from Other World Computing (only $115 after a rebate). Swapping in the new drive was surprisingly easy. Here are the main steps.
1. Install the 320 GB drive in the external enclosure, connect it to the MBPro, and format the drive using Apple's Disk Utility.
2. Create a clone of the original 120 GB drive onto the new 320 GB drive. I used an app called SuperDuper. The basic version is free, and it works great. It's very easy to use.
3. Install the new 320 GB drive into the MBPro. Shut down the computer first (obviously)! This is a little tricky, but not to be feared if you're reasonably handy with a screwdriver. The newer MBPros are designed for easy hard drive swapping, but mine wasn't - you have to take the thing apart. I followed a great instructional video from OWC. There are about 24 teensy weensy little itsy bitsy screws, and a couple of flimsy ribbon connectors to handle, so you have to be a little careful. Take your time, keep your little screws organized in the order you take them out, and it's a piece of cake. You'll need an anti-static wrist strap, a Philips #00 screwdriver, a Torx T6 screwdriver, and a strong thin plastic wedge tool for levering off the casing. I used a 1 mm guitar pick for that.
4. Once everything was back together, I booted up the computer, and checked to make sure it was working fine. I put the 120 GB drive into the external enclosure, and I'm going to keep the data on it until I'm really sure everything is working 100%. After about four weeks of using the computer, I have encountered no problems. Eventually I'll wipe the 120 GB and use it as a backup, or for offline storage.
Groovy.
Recent Music Readings
A quick blog to update the world about my reading activities. I wish I had some time to write full reviews, but I can say that all of the books below are highly recommended if you're into music.
Lady Sings the Blues - by Billie Holiday with William Dufty. This is an autobiography of Lady Day, one of my favourite jazz singers. A short but revealing book about her life, addictions, how she was exploited by others, etc..

Jelly Roll, Bix, and Hoagy: Gennett Studios and the Birth of Recorded Jazz - by Rick Kennedy. Gennett was an early recording studio and label started in 1915 by a piano manufacturer. An early recording pioneer using acoustic/wax recording facilities, they recorded numerous jazz greats: Jelly Roll Morton, Louis Armstrong, Hoagy Carmichael, and many more.
Johnny Cash : The Life of an American Icon - by Stephen Miller. Icon is right. A good bio following his life from his beginnings with some part-time musicians/full time mechanics (Marshall Grant - bass, Luther Perkins - guitar), how they caught the ear of Sam Phillips at Sun Studios with their unpolished brand new sound, through his on-again off-again pill addiction, erratic behaviour, connection with the Carter family, and so on. Fascinating character.

I Was There When It Happened : My Life With Johnny Cash - by Marshall Grant. It's the whole Johnny Cash story from the perspective of his long-time friend, bass player and road manager. It's not a really well written book - a little disjointed at times - but it's very interesting to hear the story from someone who really was there.
Soulsville, U.S.A. : The Story of Stax Records - by Rob Bowman. Stax was an important studio/label in Memphis, TN in the 1960s and 1970s. Greats such as Carla Thomas, Booker T and the MGs, Steve Cropper, Duck Dunn, Otis Redding, The Staple Singers, Sam and Dave (and many more) recorded there. This is quite an in-depth book following Stax from its inception to its ultimate financial demise. Quite fascinating. I also bought a 9 CD compilation of Stax's singles to get the aural perspective. A lot of great music came out of Stax, but many of the names are not that well known because they were up against the Motown hit machine. Although Motown had some great stuff, I think Stax deserves greater recognition.
Catch A Fire: The Life of Bob Marley - by Timothy White. Great bio on Bob Marley - lots of background and information on a reggae great. This is probably one of the better bios written about Bob.
No Woman No Cry: My Life With Bob Marley - by Rita Marley. Another good read - from Bob's wife's perspective. I didn't quite finish the book 🙁 - I lost it at the Montreal airport last August (please let me know if you find it).
More to come in a later post!