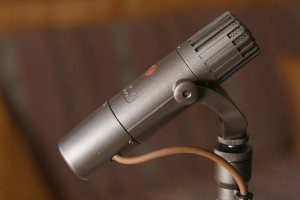
A Wired Article on Ribbon Mikes
This article just appeared in Wired. Here is a great quote: "We'll have bands come in and pick up that BK5 like it's coming out of the tomb of Tutankhamen," says Vanderslice, "Like it has this divine healing property. ..."
I have an RCA BK-5A ribbon mike in my studio and have used it on a number of things. Yeah, it sounds pretty good.
I guess I can now offer Divine Healing services! I better increase my rates!
Actually, Vanderslice continues: "... In the scheme of things, the content of the music, or the lyrics, or the sound of electric guitar or the amplifier, it is a very small percentage of what's going on."
Music?? Lyrics?? That stuff matters? Doh!! 😉
Ribbon Mike Restoration
Here's an interesting article about the guy who restored my RCA BK-5A:
Sony Condenser Mikes From The 1960s.
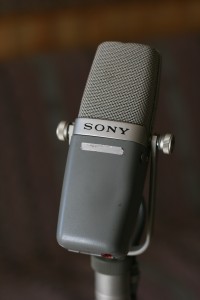
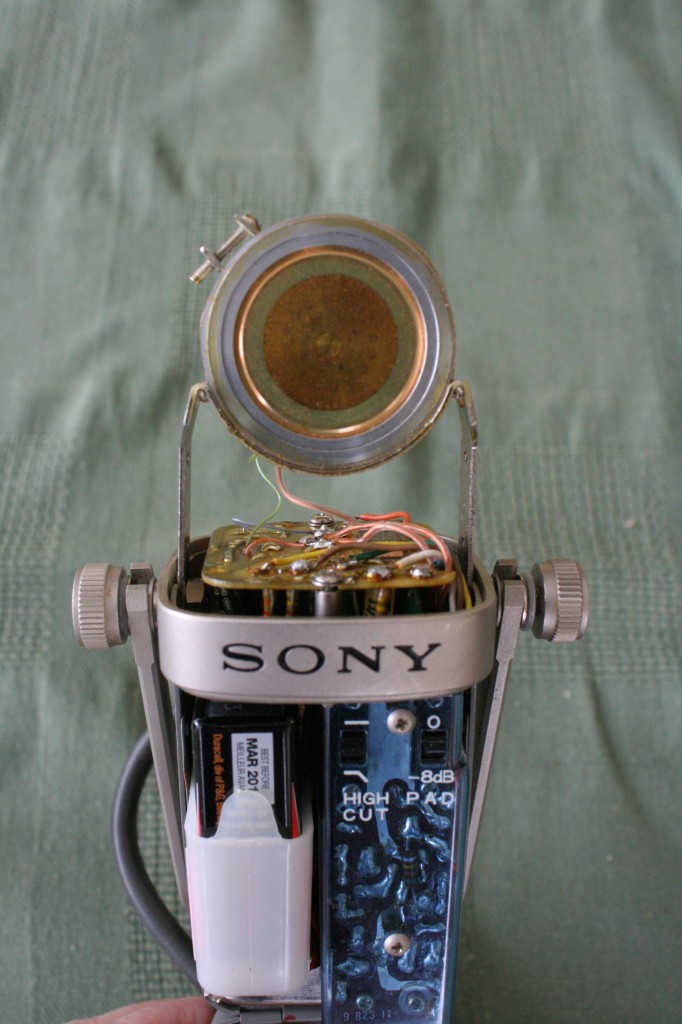
I have this old Sony condenser mike.
From the pictures and information I found on the web here, I thought it was a C-37-FET. I don't have the power supply that came with it, so I found circuit schematics to figure out how to hook up the five pin XLR connection. I tried reverse engineering the circuit in the mike, and found it's not quite like the circuit diagram in the C-37-FET Technical Manual (which is available on the above web site). Eventually I realized that it is in fact a C-38A (or B??), a 1969 update of the C-37 mikes! There isn't much info available on this mike - it seems quite rare - and I'm not sure all of the information I've found on the web is completely accurate. Apparently this mike has been used at Abbey Road studio to record the Beatles, and Herb Alpert's trumpet on A Taste of Honey:article here.
Update 2010.11.05: new information I have received indicates that my mike is almost, nearly, just about, absolutely for sure a C-38B.
I did get the mike working by building a simple five-pin to three pin XLR converter. The mike can be operated with a 9V battery inserted or an external 9V power supply. Both of these methods can be remotely switched. I suspect it also can run from phantom power since there is a centre tap off the transformer that feeds the powering circuit. But I need to verify that there is a voltage regulator that drops 48 VDC to 9VDC so the DC-DC converter doesn't get fried. The information I found on the web suggests the C-38B, made in 1971, was modified to be used with phantom power. I'm almost sure that this one is not a C-38B, because it seems the C-38B has a three-pin XLR connection, while mine has a five-pin. The guy I got this from has the exact same mike with the power supply and the storage box with the model number on it (C-38A). Turns out his is a C-38B - but the box is from a C-38A!
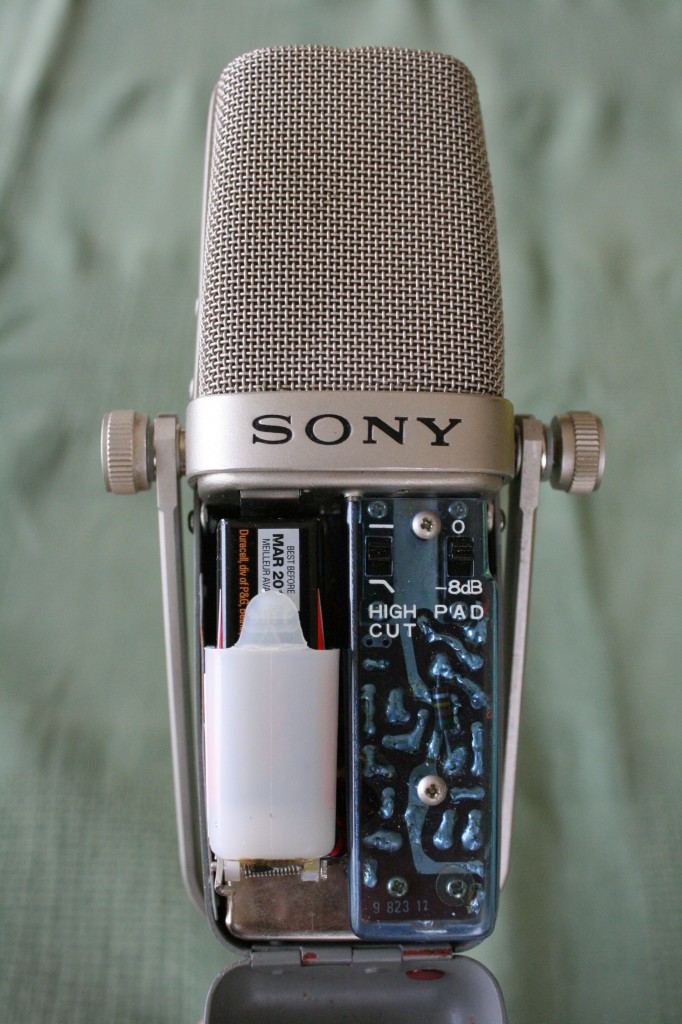
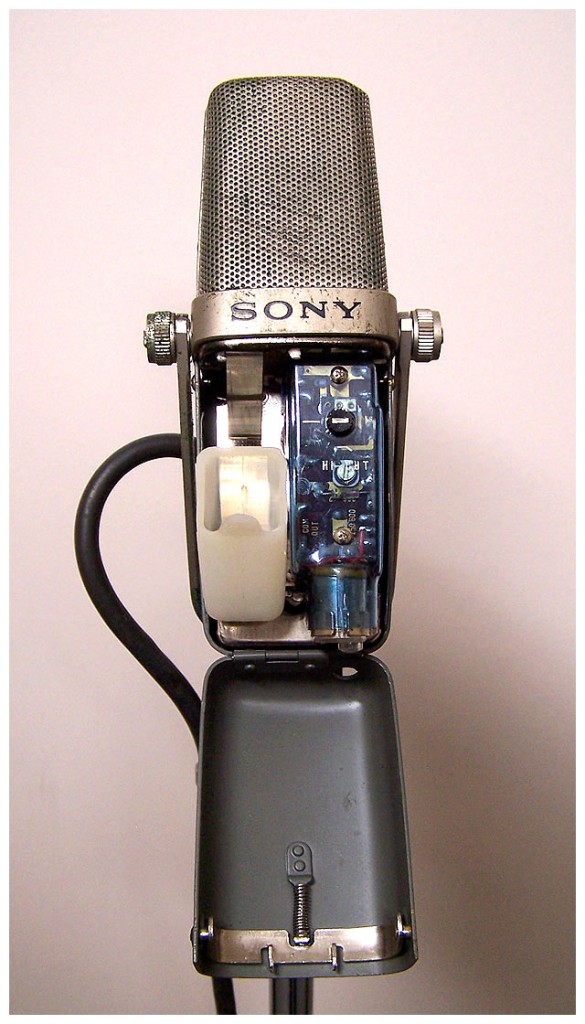
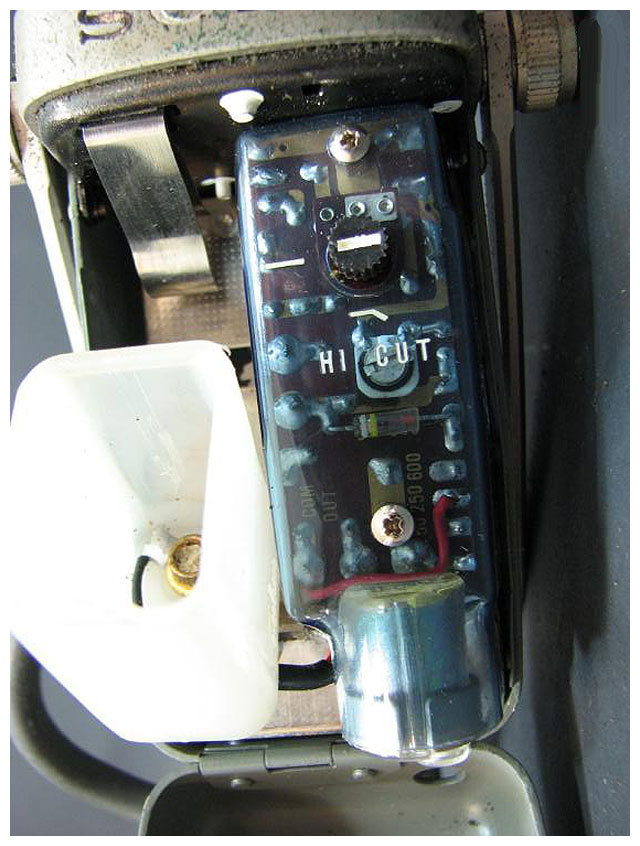
There a few differences between the C-37-FET and the C-38B. The switch on the C-37-FET can be set to BAT to check the condition of the battery. On the C-38B, the switch is mechanically blocked from going to that position. So don't bother trying (I did). The internal circuitry is somewhat different, but I haven't completely traced out the schematic yet. There are differences in the two internal switches (high cut and 8 dB pad) - see the pictures below. The C-37-FET pictured doesn't have a pad switch.
Below is the powering diagram from the C-37-FET Technical Manual, which also works with the C-38A/B. Option 1 uses the internal 9V battery, and the switch allows you to turn it off remotely. The switch on the mike has to be on. Option 2 uses the internal 9V battery and has the mike on any time the connector is connected and the switch on the mike is on. This is how I wired my connector gizmo. It seems option 3 is slightly wrong. The jumper between pins 1 and 5 is also necessary here (or connect pin 5 to the shield - same difference).
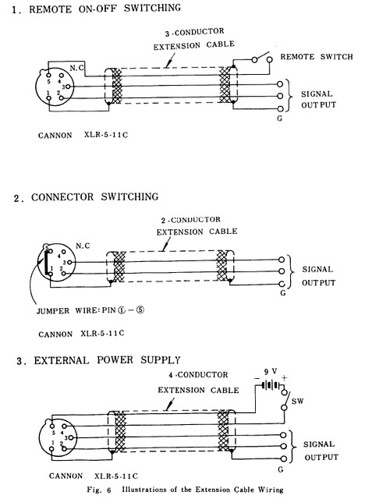
C-37-FET powering
Here is a summary of the information I have found on similar Sony mikes (I got this info from the internet and some sleuthing, so I'm not 100% sure of its accuracy. If you have any corrections please let me know.):
C-37A: A tube condenser mike introduced by Sony in 1958 intended to compete with the Neumann microphones. Because of the tube circuitry it requires a special external power supply.
C-37P: A FET version of the mike that can be powered with 48VDC to 54VDC phantom power.
C-37-FET: Made in about 1965, it's a version of the C-37A that uses a field effect transistor (FET). It can be powered with an internal 9V battery or an external 9VDC power supply. It has a five pin XLR connector for powering and remote switching.
C-38: I'm not too sure about this one, if it existed. It could be simply a re-labelling of the C-37-FET, or people just dropped the 'A' when referring to it. One source says that the C-38 and the C-37-FET are the same: the C-38 was sold in Japan and the C-37-FET was sold in the US. Update (2010.10.29): I found pictures and some brief information on the C38. It was built in 1965 and the windscreen design is quite different from the C-38A and B. It looks like the C-37-FET inside and out from the photos, but I have no documentation on the C38 to verify if the two are identical.
C-38A: An update of the C-37-FET, introduced in 1969 with a new windscreen design. It has a five pin XLR connector for powering and remote switching. Can be powered by an internal 9V battery or an external 9VDC power supply, and possibly phantom power (I will try to verify this). Update 2010.11.05: A service manual I have obtained (copyright 1980) for the US indicates that the C-37-FET and the C38A have the same internal circuitry. No phantom powering!
C-38B (1971): An update of the C-38A, introduced in 1971. I think it had a three five pin XLR connector (not sure - I have no documentation). Can be powered by an internal 9V battery or 24VDC to 54VDC phantom power.
C-38B (1977): A further update of the C-38B. According to a service manual I have found, it has a three pin XLR connector. It can be powered by an internal 9V battery or 24VDC to 54VDC phantom power.
C-38B (2003): Sony re-released the C-38B in 2003. Can be powered by an internal 9V battery or 24VDC to 48VDC phantom power.
If you have any information about any of these mikes, or corrections to the above, please send it to me, especially the C-38A and C-38B (original) since that information is quite rare. This blog entry has become a little messy with corrections, so I plan to write an updated entry with the most complete information I can find. Owner's manuals and schematics would be great. Thanks!
Edit: Apparently this mike is the classic Manzai mike in Japan (thanks ratite!!). See this.
Restored RCA BK-5A
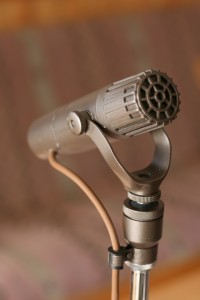
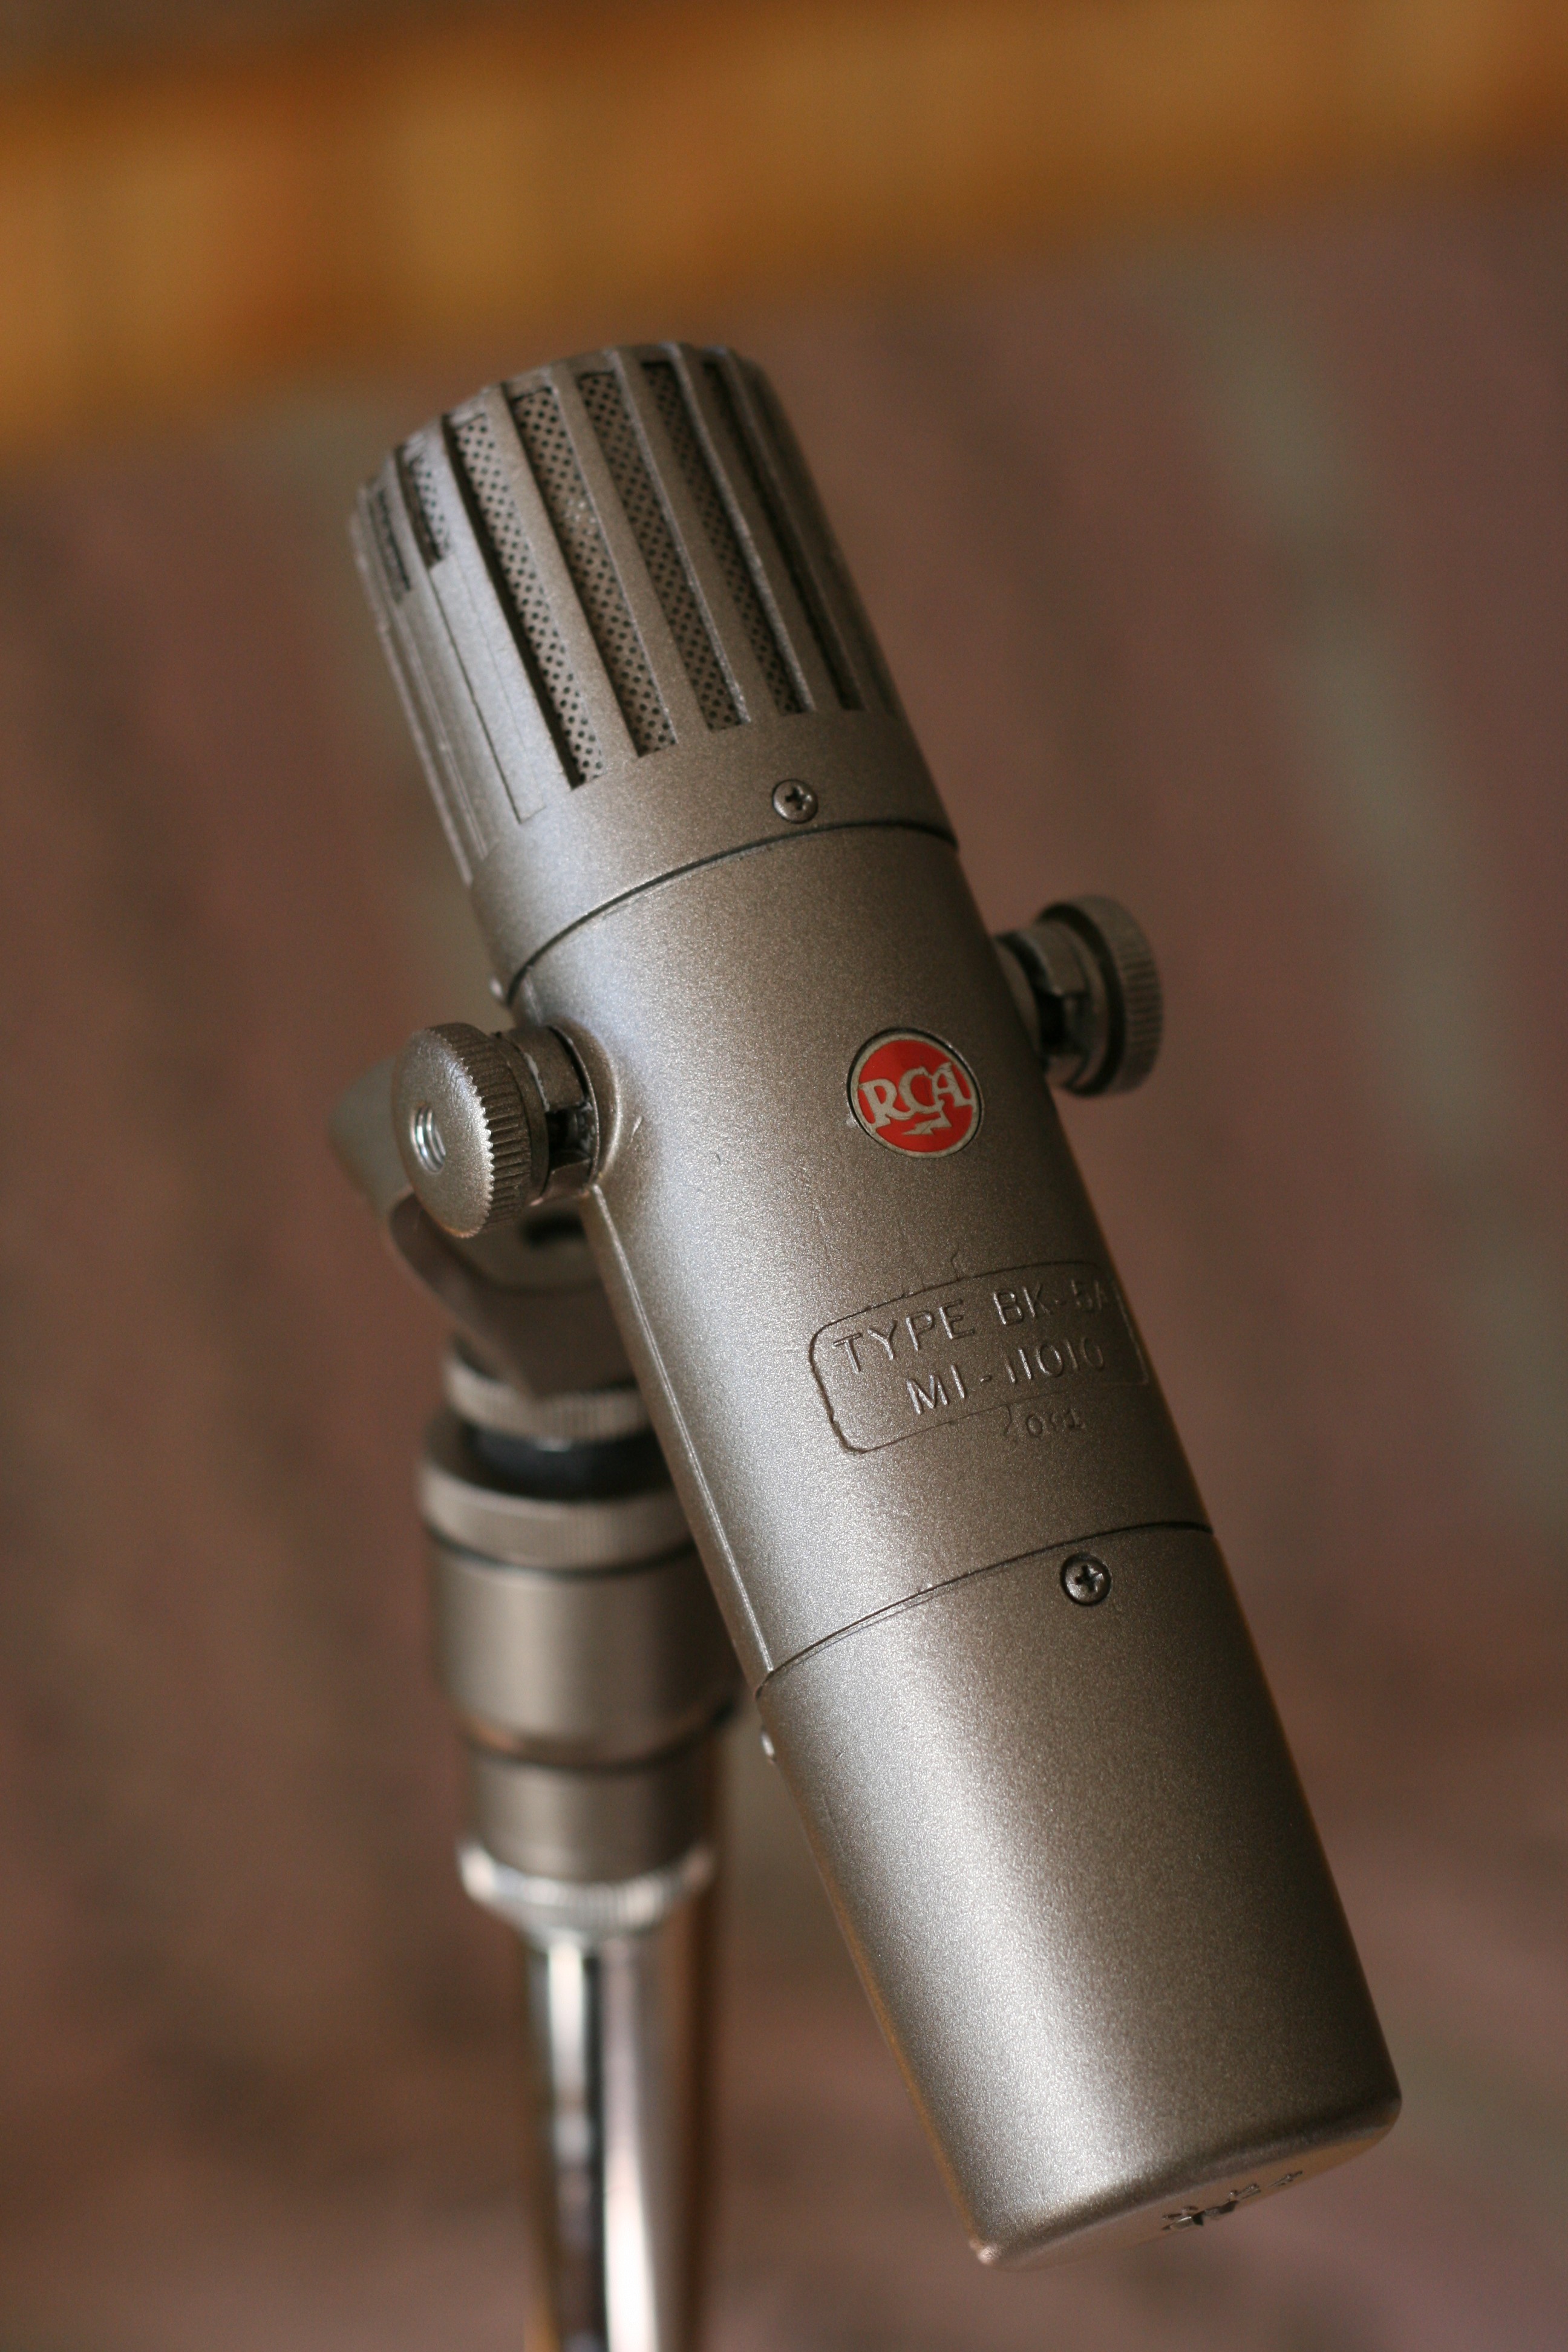
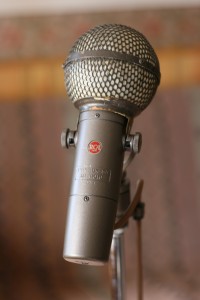
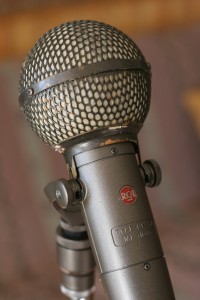
The RCA BK-5A ribbon mike is back in my hands. Here is a before picture, followed by some after pics. The mike was sanded and repainted to the original colour. The ribbon was completely missing inside the mike (which is what I suspected - I couldn't find one when I took it apart), so Clarence cut a new one and installed it according to the original RCA specification (size, tension, etc.). He put on a new cable since the old one was cracking up. The little screws were mostly missing, and the ones that were there were stripped, so they were all replaced. I didn't have the original shock mount, so Clarence supplied a reproduction shock mount that looks like the original. This mount was pretty expensive, but what are you gonna do. He supplied the knurled knobs for the mount, but unfortunately the threads on the mike are kind of screwed up - somebody must have cranked on the wrong size thread. So I'm not sure how to fix that. I had the little RCA medallion and so that is glued back on. It looks pretty good, and now it's time to check how it sounds.
Read more on ribbon mikes here.
RCA BK-5A
A quick update ... my RCA BK-5A ribbon mike has been restored by Enak Microphone Repair, and is on its way back to me! It should arrive within a few days along with a repaired mount for my old Sony C37-FET condenser mike. I can't wait to try it out on a vuvuzela. Actually, the only reason I said vuvuzela is to see if I get more google hits. Vuvuzela ya later.
RCA BK-5A
By really dumb luck, I happened to get my hands on an RCA BK-5A, a classic old ribbon microphone from about 1955. A friend of mine had it stashed away in a closet for years and I told him I'd be happy to take it off his hands and get in working order again. It's in rough shape cosmetically and the ribbon is missing. From what I've heard about this mike it's going to be a great addition to the mike complement in my studio. Here is a link to some information: RCA BK-5A.
I found a few places that do restorations on ribbon mikes. They all seem to be pretty well regarded, but I decided to go with ENAK Microphone Repair. The guy there has apparently worked for RCA beginning about 1952, and has been doing high quality restorations for years. I look forward to getting it back and trying it out on vocals and various instruments. I'll put up some pictures of it in a later post, and perhaps some audio clips too.
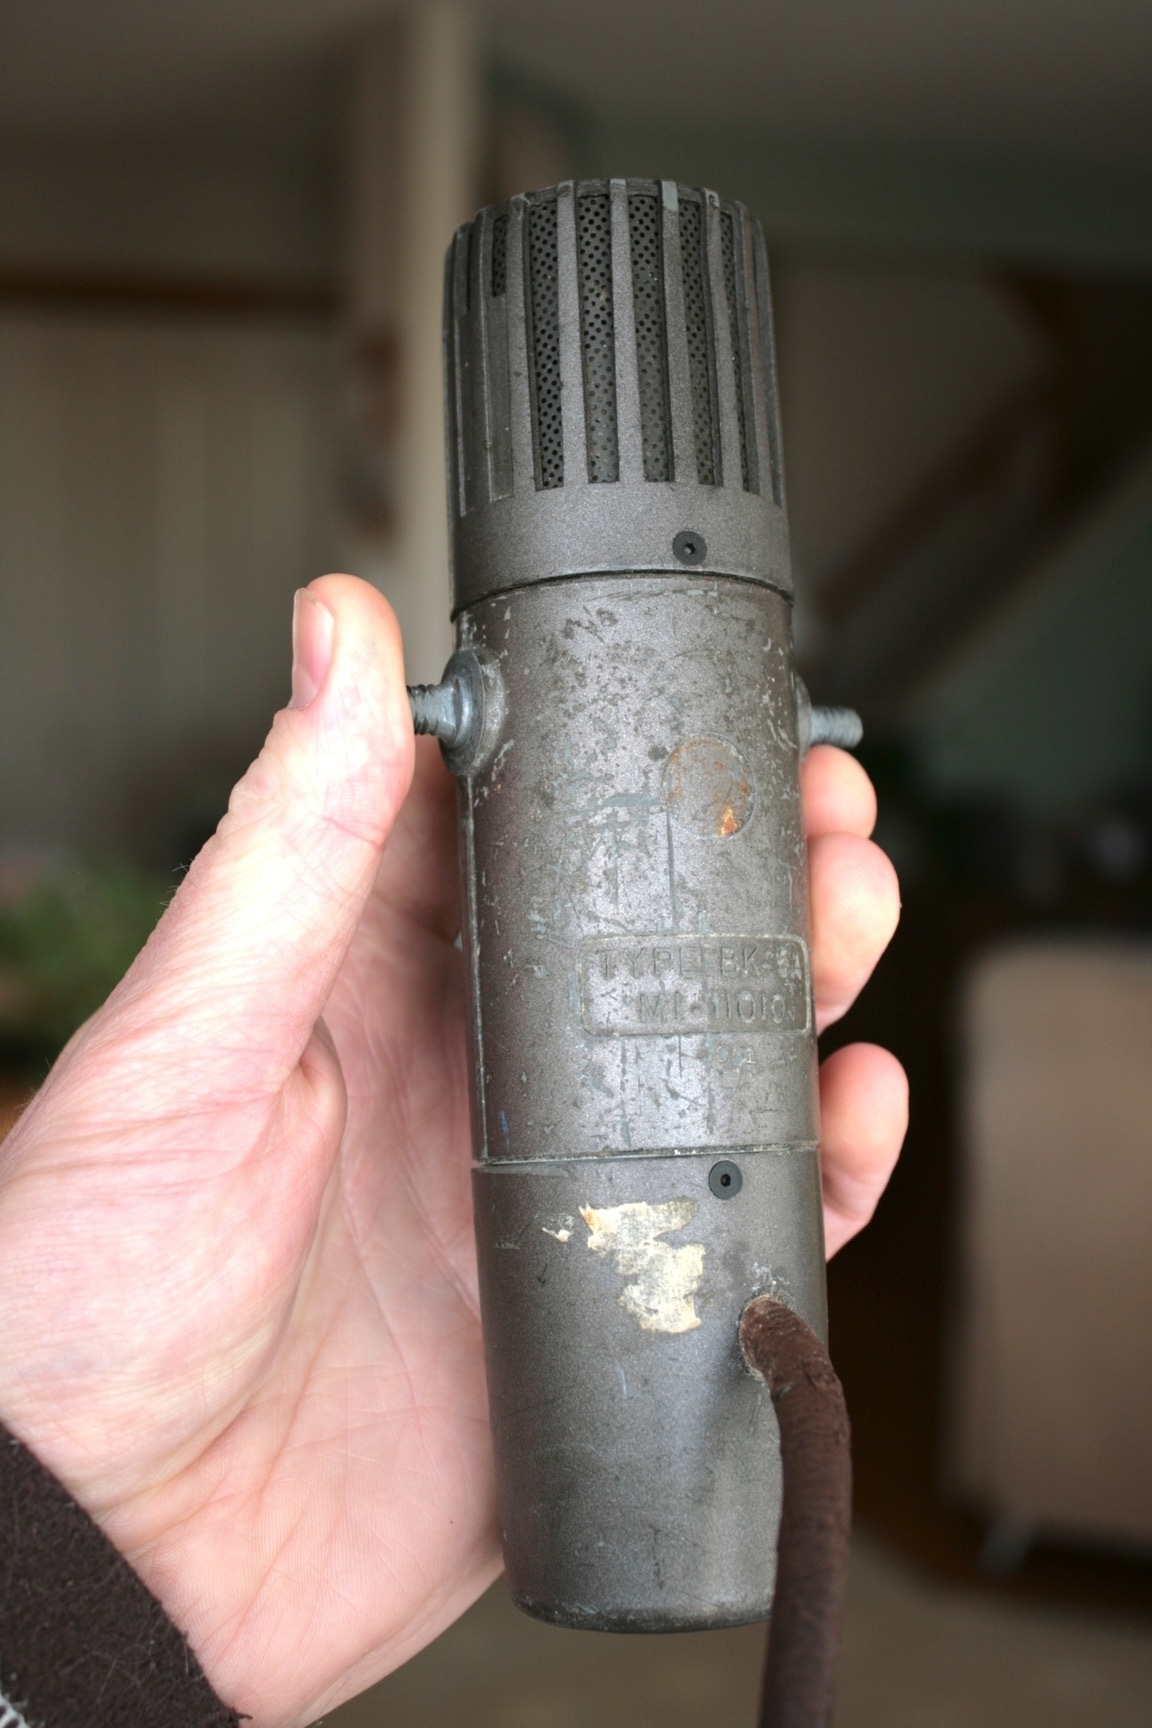
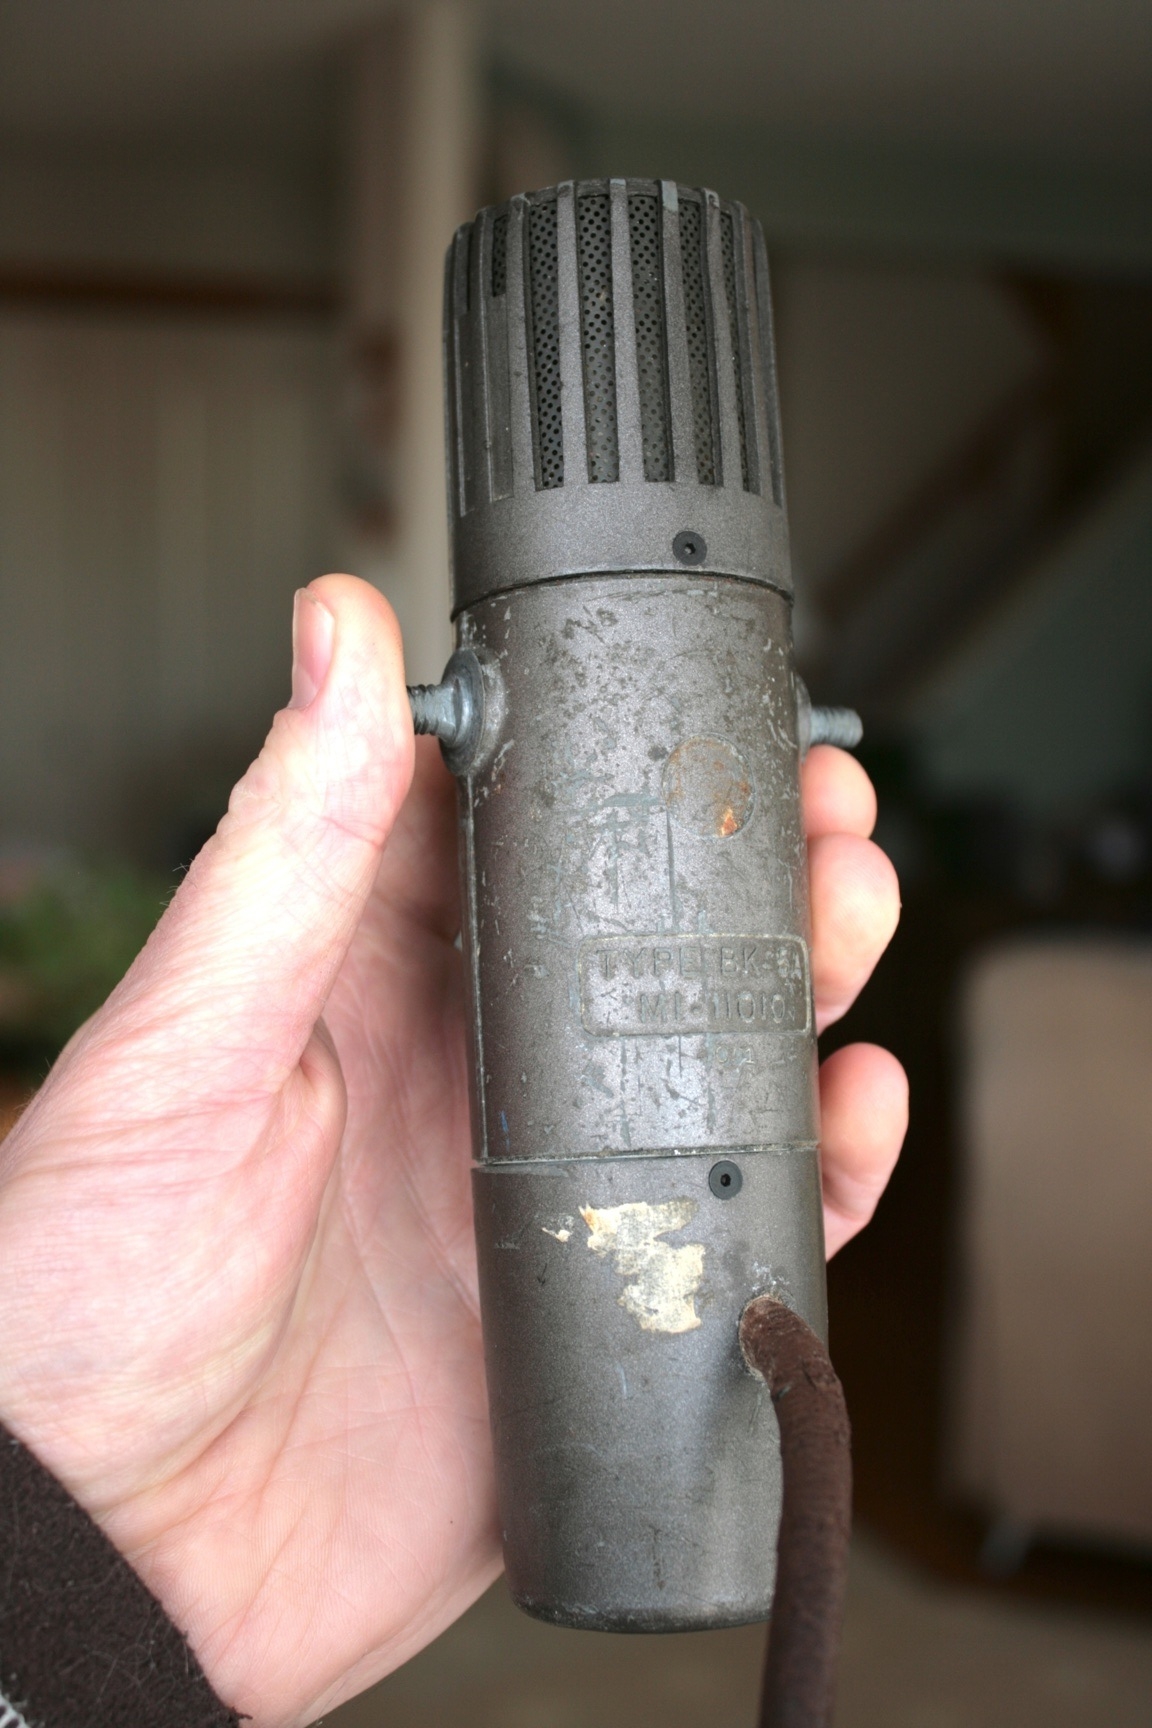
RCA BK-5A before restoration.
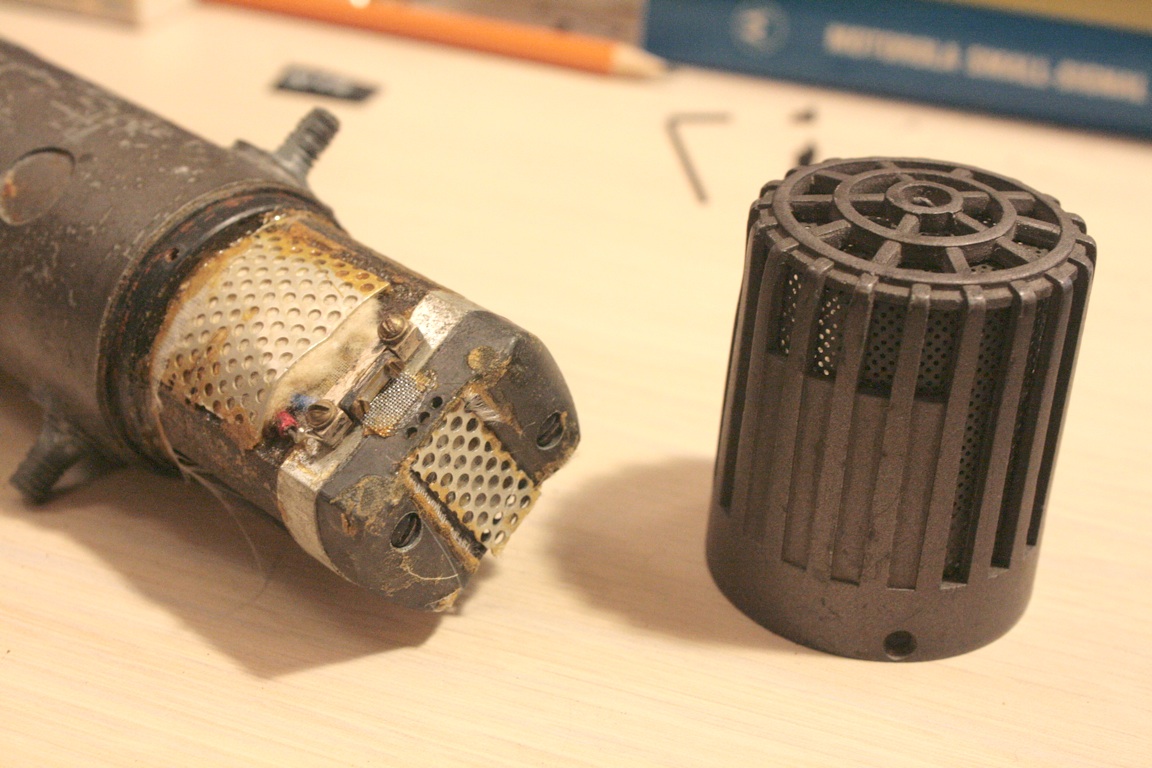
RCA BK-5A before restoration.
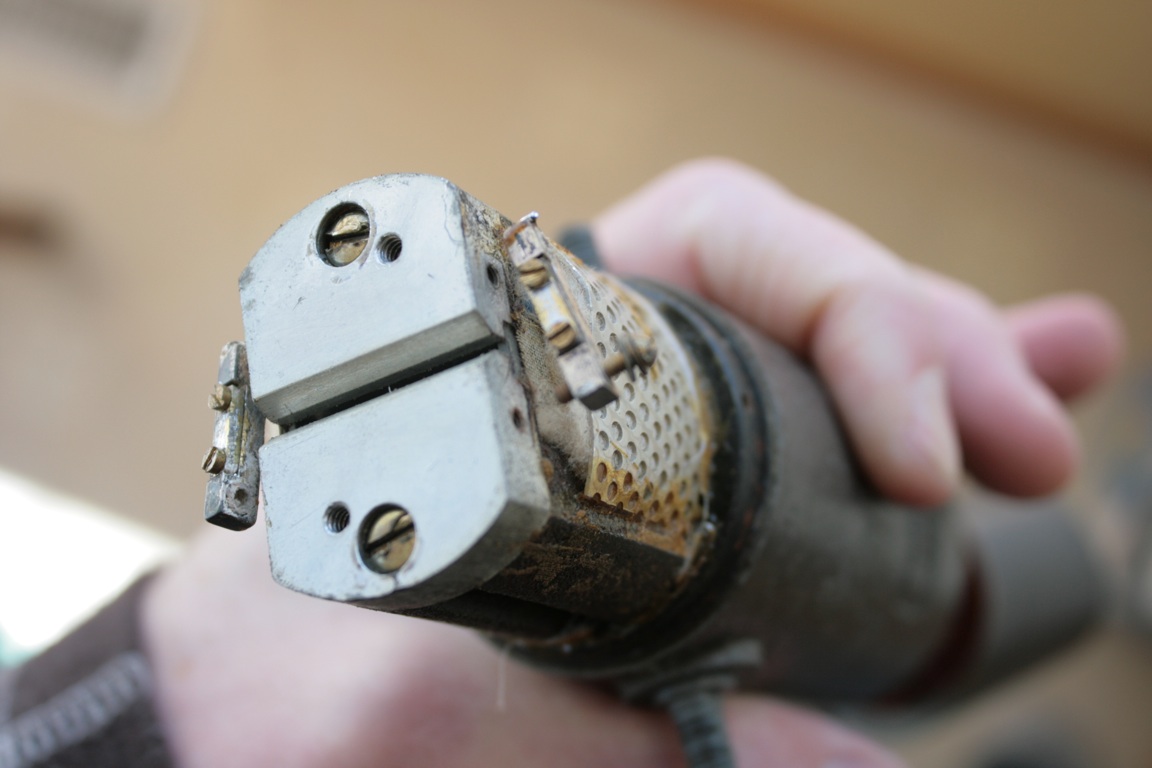
RCA BK-5A before restoration. It looks like the ribbon is missing.
More Techie Stuff On Microphones – Frequency Response
So I asked a bunch of people what they thought of Part 1 of my microphone article. It seems most people liked it, but some people thought it was too techie (Part 2 will not be so techie, so stay tuned), some people thought it was not techie enough and wanted to know lots more, and some people thought it was about right. I guess on average it was about okay. A lot more could be said about microphones, so especially for you tech-heads, here's an addendum.
A person might well ask, what are the main aspects of microphones that would make you choose one over another? (Go ahead, ask me.) Well, there's the price, size, reliability, the looks, pickup pattern (I talked a little about cardioid, hyper-cardioid, figure eight, and omni-directional patterns in Part 1), sensitivity, low noise and perhaps most importantly, how it sounds. Of course there are many different applications of microphones, like broadcast, live and studio situations, and many different sound sources, like drums, electric guitars, acoustic instruments, piano, voices, horns, and so on. That's too much to cover, so I will talk primarily about vocals and acoustic instruments, and "how it sounds". In using a mike, the goal is normally to pick up the vocal or instrument as accurately as possible, so that it sounds most natural through the sound system. Knowing that any sound is composed of a wide range of vibration frequencies (sound audible to humans ranges from about 20 Hz to 20 kHz at best), the frequency response of a microphone is a useful measure of the accuracy of the mike, and you would expect (perhaps?) this frequency response to be very flat, so that all audible frequencies are reproduced equally.
Let's look at the frequency responses of a few commonly-used mikes. Fig. 1 shows the typical response of the AT4033/CL, a cardioid condenser mike favoured by Del McCoury, and many bluegrass bands. Notice that it's not really flat? There are a few bumps up around 6 kHz and 10 kHz. 10 kHz is an area of the sound spectrum that can be described "crispy," "bright," "breathy," and so on. This emphasis in response here can help bring out bright aspects of strings and voices. Intelligibility of a vocal resides between about 4 to 6 kHz. The response drops off above 15 kHz and below about 30 Hz. Frequencies above 15 kHz are really quite high pitched, and most people can't hear much of it anyways, so it's not useful to reproduce (and it's harder too). The lowest note, E, on a string bass is about 42 Hz, so you don't need much below that either. You need some response at the bottom, however, so keep the fullness of the notes intact. Note that there is a roll-off curve too. Most mikes have a low rolloff switch (also called high pass) to attenuate the lower frequencies. There are two main reasons for this. First, a lot of low frequency noise can appear from stage rumbling and mike handling, so rolling that off is very helpful and doesn't harm the sound. Second, pretty much all cardioid pattern mikes have a problem (or benefit, depending on your viewpoint) called proximity effect. That is, the closer you get to the mike, the more pronounced the low frequencies become. So rolling that off can compensate when you're singing or playing quite close to the mike.
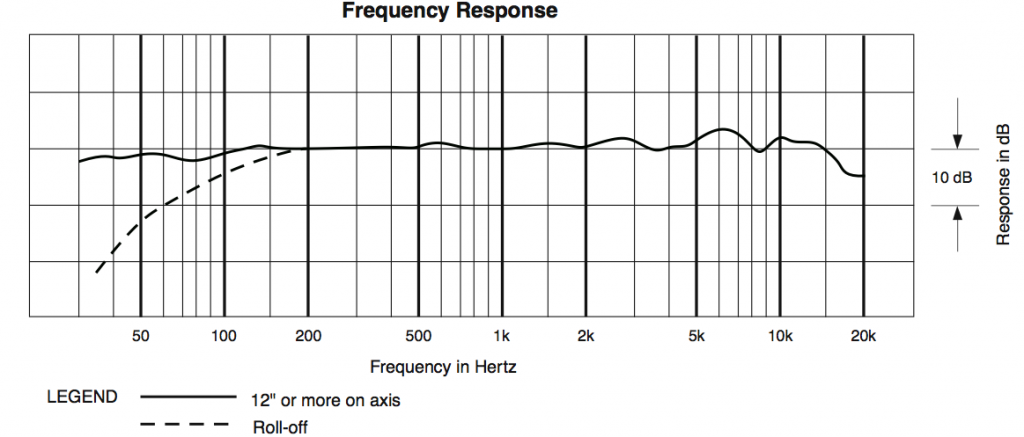
Frequency response of AudioTechnica AT4033/CL
Fig. 2 shows the cardioid response of the KSM44, another popular bluegrass condenser mike. Like the AT4033/CL, there are two bumps up at about 6 kHz and 10 kHz. This plot shows the proximity effect quite well: the low end response is quite high even 15 cm from the mike. Fortunately this mike has a three-position low frequency rolloff switch to compensate.
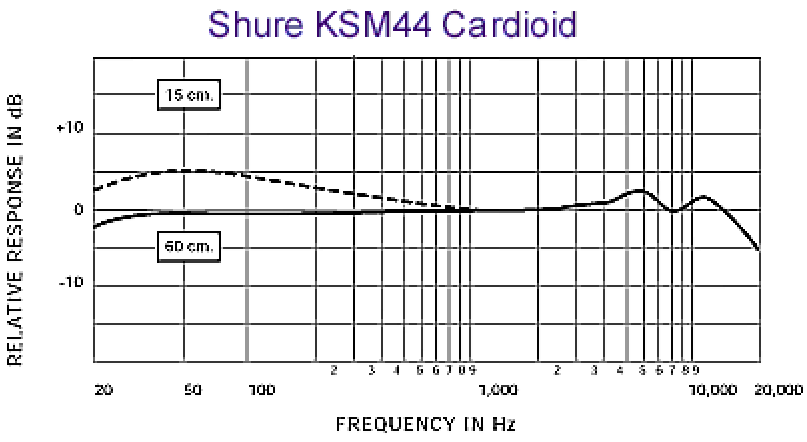
Frequency response of Shure KSM44.
Fig. 3 shows the frequency response of the Neumann U87Ai, one of the most commonly used mikes in recording studios (the studios that can afford them anyhow). This is a smoothed curve - individual mike responses usually are much bumpier. Again, there's a bump up around 8 to 10 kHz, and pretty drastic rolloff starting at 60 Hz. With the low cut switch on, the rolloff is even more dramatic.

Frequency response of Neumann U87Ai.
Finally, Fig. 4 shows the response of the Shure SM81, a small diaphragm condenser mike favoured for miking acoustic instruments and cymbals. Notice how flat the response is all the way from about 40 Hz to about 15 kHz.
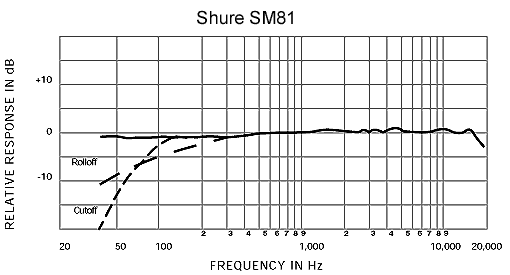
Frequency response of Shure SM81.
How do mike manufacturers achieve different results? The are a few factors. First, there is the diaphragm design. The diaphragm is the part that vibrates with the sound. A large diaphragm (about 1 inch in diameter) generally has a good low frequency response, but might not move fast enough to capture high frequency transients that happen with bright guitar strings and cymbals. Small diaphragms capture high frequencies and transient detail better but may suffer in the low end. There are also medium sized diaphragm mikes that offer a good compromise. Another factor is the acoustic design of the capsule mounting and housing. Changing the shape of the housing and the positioning of the capsule can change the acoustic characteristics of the mike. Finally, the electronics inside the mike (especially in the case of condenser mikes) have a significant effect. Two main classes of electronics in condenser mikes are tube mikes and FET (field effect transistor) mikes.
I started out by supposing that a "good" mike should have a flat frequency, but it turns out that the best mikes chosen by most recording engineers and musicians do not necessarily have such a characteristic. The frequency response is an objective measure, but really people choose equipment subjectively to suit the task, and according to what they want to hear. This leads into a whole new topic called psychoacoustics, which is about how the human ears and brain perceive sounds. Read about that here.
In summary, it looks like a lot of good mikes have similar characteristics, but there are numerous subtle differences too. Knowing that most mikes have been designed carefully to have particular characteristics for a particular job, you realize that you shouldn't have to do much equalization to get a good mike to sound good. Mike placement, however, can make a huge difference in how things sound, and that's a whole 'nother topic too.
A person might well ask, which mike should I buy? (Go ahead, ask me.) Um ... it depends on many things: budget, application, personal preference, etc. That sounds like another whole 'nother topic. My best advice for now: buy the best one you can afford, stick to some good and proven brands (Shure, AKG, AudioTechnica, etc.), be suspicious of hype and myths, and don't worry about it too much.
I Upgraded the Hard Drive In My MacBook Pro

My main computer in the recording studio is a 2.33 GHz Core 2 Duo MacBook Pro cca. 2007. The hard drive that it came with was only 120 GB, which isn't very big when you have a number of recording projects on the go, lots of photos, iTunes full of tons of music and so on. So I ordered a 320 GB drive and external USB2 enclosure from Other World Computing (only $115 after a rebate). Swapping in the new drive was surprisingly easy. Here are the main steps.
1. Install the 320 GB drive in the external enclosure, connect it to the MBPro, and format the drive using Apple's Disk Utility.
2. Create a clone of the original 120 GB drive onto the new 320 GB drive. I used an app called SuperDuper. The basic version is free, and it works great. It's very easy to use.
3. Install the new 320 GB drive into the MBPro. Shut down the computer first (obviously)! This is a little tricky, but not to be feared if you're reasonably handy with a screwdriver. The newer MBPros are designed for easy hard drive swapping, but mine wasn't - you have to take the thing apart. I followed a great instructional video from OWC. There are about 24 teensy weensy little itsy bitsy screws, and a couple of flimsy ribbon connectors to handle, so you have to be a little careful. Take your time, keep your little screws organized in the order you take them out, and it's a piece of cake. You'll need an anti-static wrist strap, a Philips #00 screwdriver, a Torx T6 screwdriver, and a strong thin plastic wedge tool for levering off the casing. I used a 1 mm guitar pick for that.
4. Once everything was back together, I booted up the computer, and checked to make sure it was working fine. I put the 120 GB drive into the external enclosure, and I'm going to keep the data on it until I'm really sure everything is working 100%. After about four weeks of using the computer, I have encountered no problems. Eventually I'll wipe the 120 GB and use it as a backup, or for offline storage.
Groovy.
